Masters in Qualis DMS are used to store and maintain data outside a process and refer it in process using "Master" field type in the form. For example, when you store a sample, you may want to look up the storage data such as organisation, department, lab, site, section etc. In this example storage location data can be created and managed as a master. Also, user data can be created and managed as a master.
In Qualis DMS you can add/create masters, edit master details and delete existing masters
Qualis DMS allows you to create and manage organization as follows:
Qualis DMS allows you to create and manage user by
User Management
Users, Role, Control and Designation are created and managed as masters.
Qualis DMS allows you to create users, roles, assign multiple roles to users, assign screen level and control level permissions to refine access to your lab information.
User roles and permissions
Qualis DMS users are assigned user roles, which in turn control their permissions and access to DMS tools and their ability to view, add, modify, and delete documents and other DMS data.
Designation master is used to create and manage designations that are used in user management, and workflows.
To create a new designation, follow these steps
On the Explorer, click MASTER, User Management and then click Designation. The Designation. master screen appears as shown in the figure:
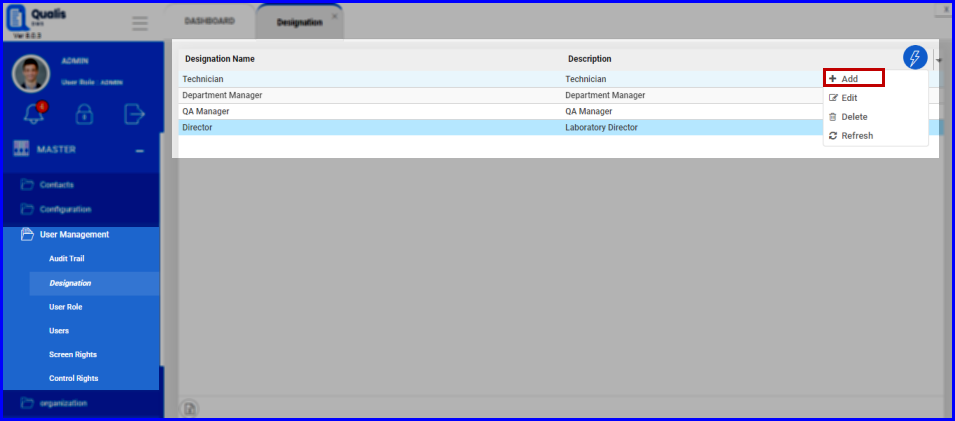
FIGURE: - Designation Master Screen
In the Designation master screen you can see the list of designations created. Also options to add, edit and delete designations appear as shown in the above figure.
2.Click action menu and then click Add.. The Add Designation dialog appears as shown in the figure:
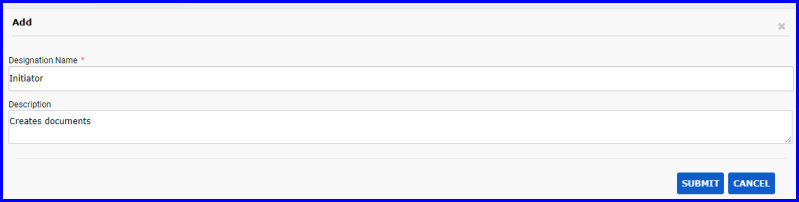
FIGURE: - Add Designation Dialog
3.In the Designation Name field, type the name for the designation..
In the Description field, type the description.
5.Click SUBMIT.
You can see the designation you created listed in the Designation master.
2.To delete a designation, in the Designation master screen, select the designation you want to delete, click action menu and then click Delete
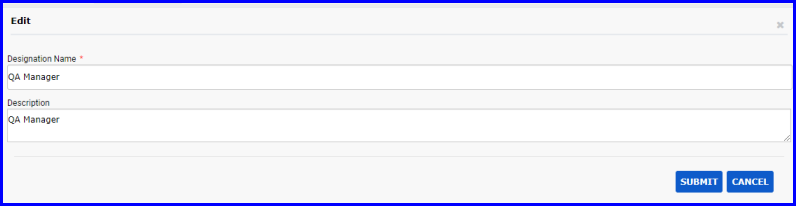
FIGURE: - Edit Designation Dialog
To create a new role, follow these steps:
1.On the Explorer, click MASTER,click User Management and then click User Role. The User Role tab appears as shown in the figure:
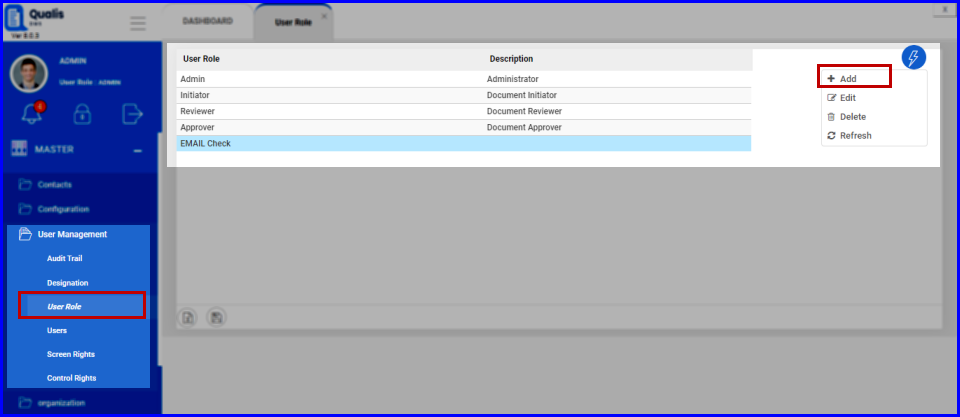
FIGURE: - User Role Tab
2.In the User Role tab, click action menu and then click Add. The Add. User Role dialog appears as shown in the figure:
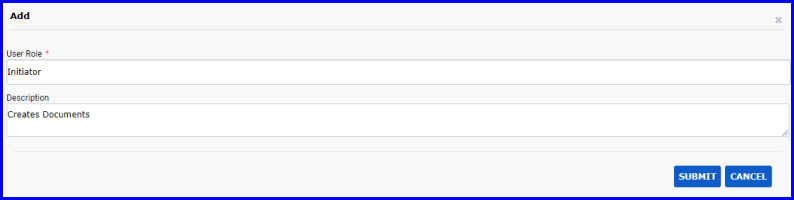
FIGURE: - Add User Role Dialog
3.In the User Role field, type name for the role you want to create.
4.In the Description field, type the description.
5.Click SUBMIT.
You can see the role you created listed in the user role master..
1.To edit a role, in the User Role master screen, select the role, click action menu and then click Edit. In the Edit Role dialog, do required changes and then click SUBMIT.

FIGURE: - Edit User Role Dialog
To delete a role, in the User Role master screen, select the role you want to delete, click action menu and then click Delete.
To create a new user account, follow these steps:
On the Explorer, click MASTER, click User Management and then click Users. The Users tab appears as shown in the figure:
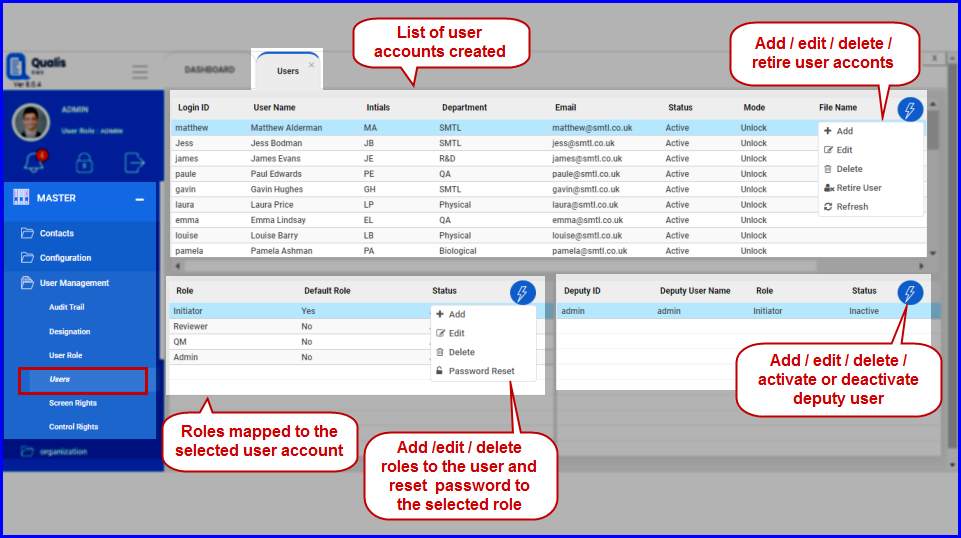
FIGURE: - Users Tab
2.In the Users tab, click action menu and then click Add. The Add. Users screen appears as shown in the figure:
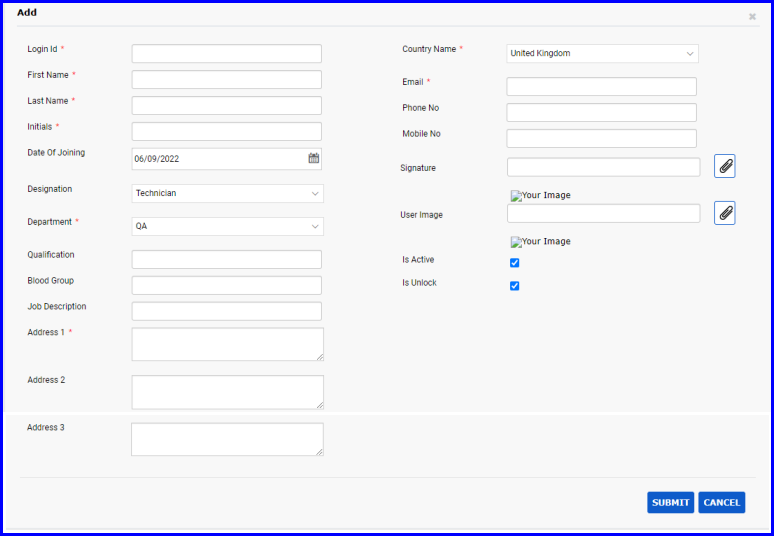
FIGURE: - Add User Screen
3.Type the Login Id, First Name, Last Name, Initials, Department, Address 1, Country Name, E-mail and other fields as required.:.
4.Click SUBMIT.
Now you can assign role(s) to the user account. You can map multiple roles to a user account and set a role as default role.
To map user account to a role, follow these steps:
The new user account is created and listed in the grid in the Users screen.
1.In the Users screen, select the user account to assign a role..
2.Under Role, click action menu and then click Add as shown in the figure:
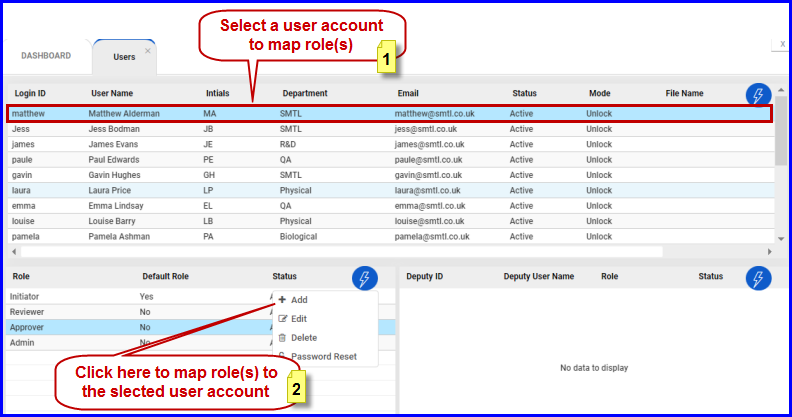
FIGURE: - Adding User Role Screen
The Add User Role dialog appears as shown in the figure:

FIGURE: - Adding User Role Screen
3.In the User Role list field, select the role you want to assign to the user.
4.Click Is Active to make the role active to the user.
5.Click to check Default Role field to make this role default role for the user.
6.Click SUBMIT. The selected role is assigned to the user.
Note: You can map multiple roles to a user out of which only one can be a default role.
1.To edit a role assigned to the user, in the Users screen, select the user, under Role, select the role to edit, click action menu and then click Edit. In the Edit User Role dialog, do required changes and then click SUBMIT.
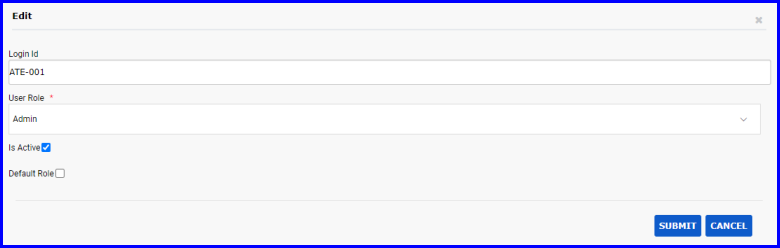
FIGURE: - Edit User Role Dialog
2.To delete a role assigned to the user in the Users screen, select the user, select the role to delete, click action menu and then click Delete. You cannot delete default role assigned to the user.
1.To reset password, in the Users screen, select the user, under Role, select the role to reset password, click action menu and then click Password Reset. The Confirmation Dialog appears as shown in the figure:
1.On the Explorer, click MASTER, Organisation and then click Section. The Section master screen appears as shown in the figure:

FIGURE: - Password Reset - Confirmation Dialog
2.Click OK. Next time, when the user logs in using the selected role, the system will prompt to create new password as shown in the figure:.
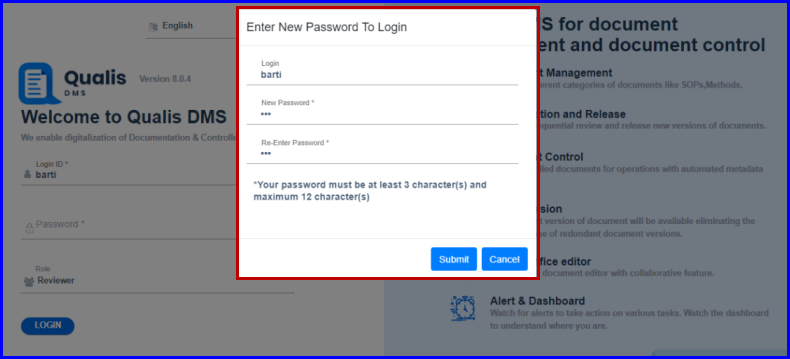
FIGURE: - Enter New Password To Login Dialog
You can add deputy users to a selected user account. To do so, follow these steps:
1.In the Users screen, select the user account to assign deputy user.
2.Under Role, select the role to assign the deputy users(The user shall be mapped to multiple roles. Select a role to which you want to map deputy user(s))
3.Click action menu and then click Add as shown in the figure:
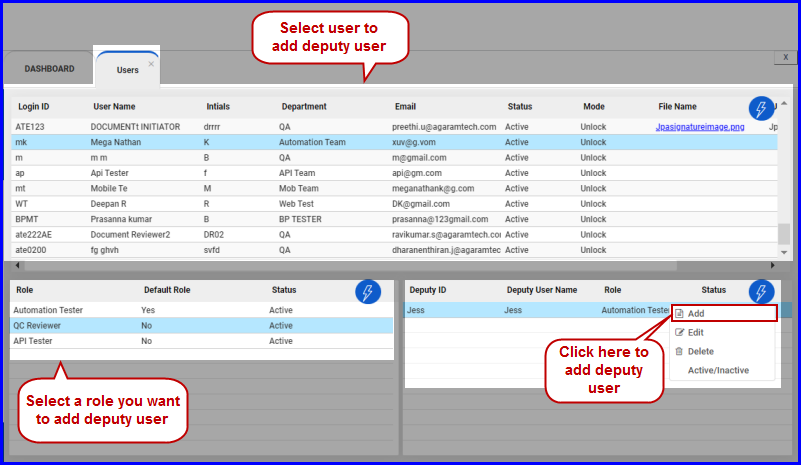
FIGURE: - Adding Deputy User Screen
The Add Deputy User dialog appears as shown in the figure:
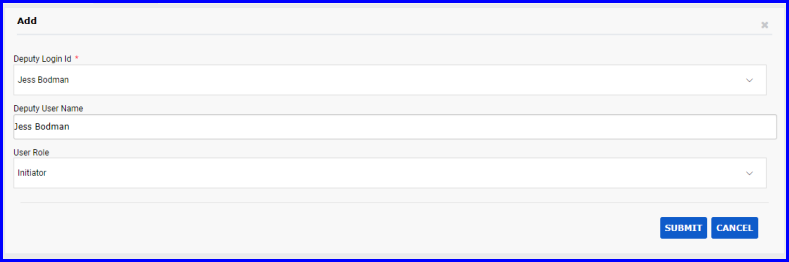
FIGURE: - Add Deputy User Dialog
4.In the Deputy Login Id field, select the user/login id you want to add as deputy user.
5.In the User Role field, select the role.
6.Click SUBMIT. The selected role is assigned to the user as deputy user
Note: You can map multiple deputy users to a user.
1.To activate/deactivate deputy users, in the Users screen, select the user, under Role, select the role, select the deputy user, click action menu and then click Active/Inactive. The Confirmation Dialog appears as shown in the figure:
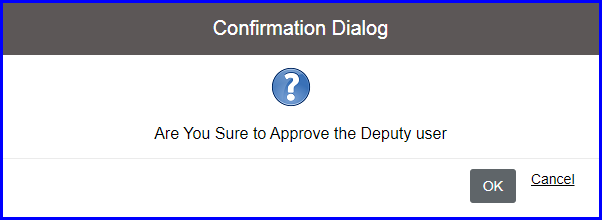
FIGURE: - Approve Deputy User - Confirmation Dialog
2.Click OK. The selected deputy user is activated / deactivated.
To define screen level permissions for roles and users, follow these steps:
1.On the Explorer, click MASTER, click User Management and then click Screen Rights. The Screen Rights screen appears as shown in the figure:
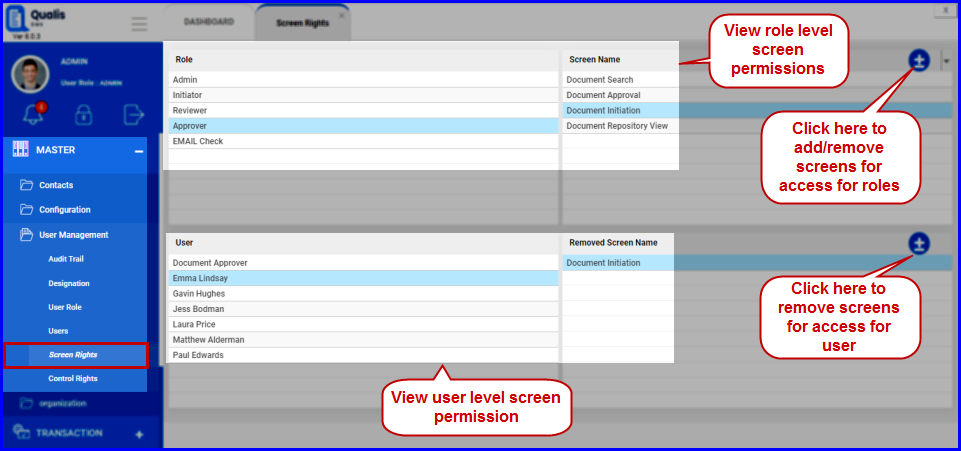
FIGURE: - Screen Rights Screen
2.Select a role from the left side. You can see the list of screen that the role has permissions.
3.To add or remove screens from/to the list, click .  The Screen Name dialog appears as shown in the figure:.

FIGURE: - Add and Remove Screen Dialog
4.Use 
 thearrows to add or remove the screens to grant/revoke permissions..
5.Click OK.
Same way, you can revoke screen permissions for the users.
To define control level permissions for roles and users, follow these steps:
1.On the Explorer, click MASTER, click User Management and then click Control Rights. The Control Rights screen appears as shown in the figure:
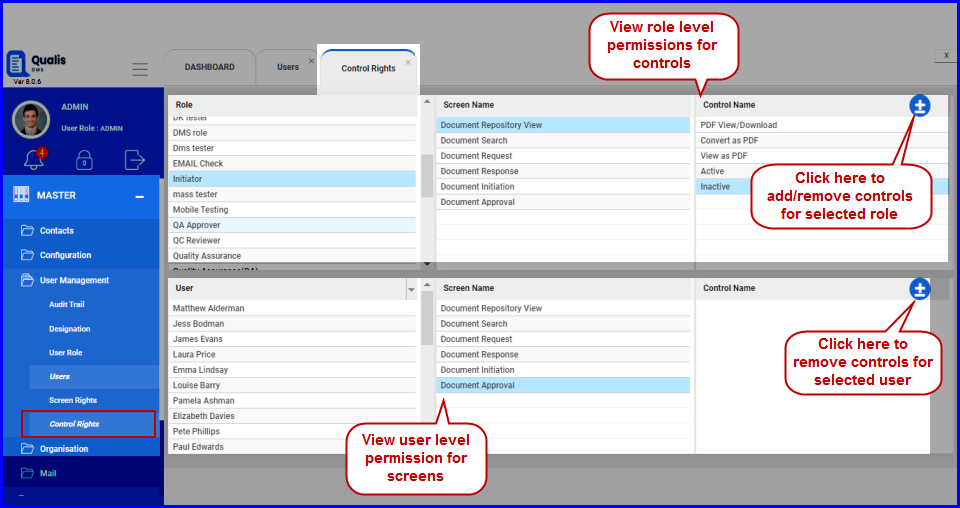
FIGURE: - Control Rights Screen
2.Select a role from the left side. You can see the list of screens and the list of controls in the selected screen that the role has permissions.
3.To add or remove controls from/to the list, click. The Control Name dialog appears as shown in the e figure:
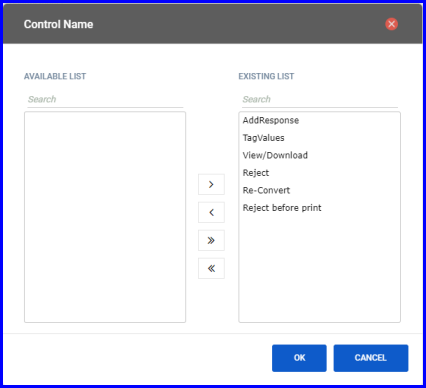
FIGURE: - Control Name Dialog
4.Use the arrows to add or remove the controls to grant/revoke permissions.
5.Click OK.:
Same way, you can revoke permissions for controls for the users.
Audit Trail menu helps you to view audit trail log. Also enables you to filter records based on date range, user and module name, export records to excel file, print records, create archive and open archive to view.
To view audit trail log, follow these steps:
1.On the Explorer, click MASTER, click User Management and then click Audit Trail. The Audit Trail log screen appears as shown in the figure:
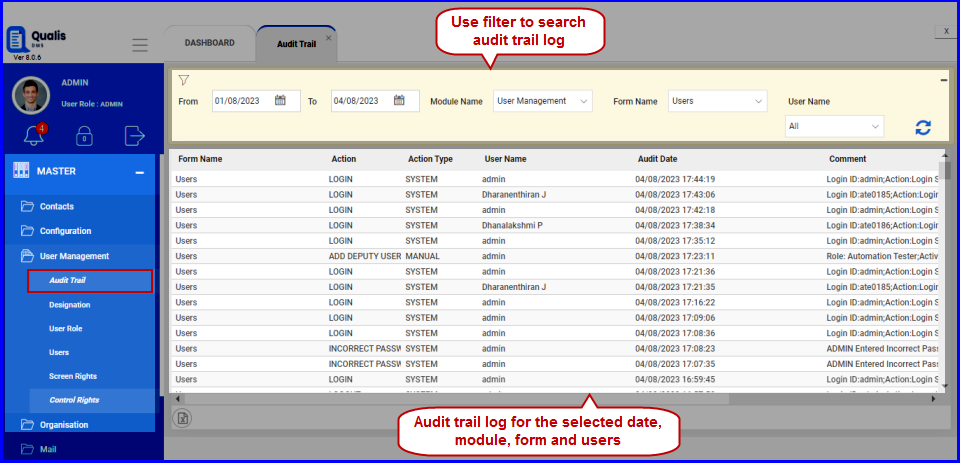
FIGURE: - Audit Trail Log Screen
You can filter records based on the Date range: Select the From and To date and then click  to filter records based on the specified date range..
You can also filter records based on Module Name, Form Name and User Name.
2.In the Module Name field, select a module. Forms/screens in the selected module appears in the Form Name field.
3.In the Form Name field, select the form.
4.In the User field, select user. .
Click
Audit trail records for the selected date range and for the selected module, form and user appears as shown in the above figure.
