1.2 Material Inventory
Material Inventory tab enables you to do the following:
- Add material to inventory.
- Do inventory transaction.
- Add related files to the inventory transaction.
Note: For administrators the ActiveSite field will appear. Hence, administrator user can create site specific transactions.
1.2.1 Adding Material to the Inventory
Once the material is added to the Material master, you must add the material to the inventory. And then issue the material to use the material in transactions.
To add a material to the inventory, follow these steps:
- On the main menu, click
 and then click Material Inventory. The Material Inventory screen appears as shown in the figure:
FIGURE: Material inventory Screen
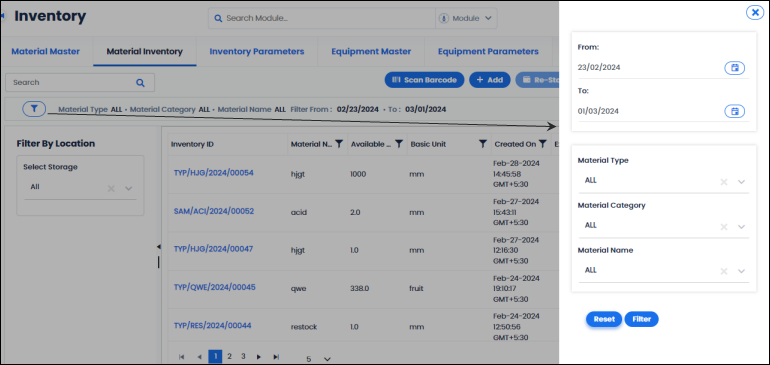
By default, all material types and categories added for the last one week from all storage locations appear. You can see the status of the materials in different colors.
- You can choose filter options
 to search materials added. Click. The filter appears as shown in the figure:
FIGURE: Selecting Material Type, Category and Material to add Inventory
- Select From and todates, Material Type, Material Category, Material Name, and then click Filter. Materials are fetched for the selected filter options. You can also filter materials based on the selected location in the Select Storage field under Filter by Location.
- To add material to the inventory, click Add. The Add Inventory dialog appears as shown in the figure:
FIGURE: Add Inventory Dialog
- In the Material Type field, the material type you want to add inventory.
- In the Material Category f ield, the material category you want to add inventory.
- In the Material Name field, select material name.
- In the Quantity field, type the quantity of material received. The unit of the material appears in the Unit
- In the BATCH/ LOT NO field, type the lot number of the material.
- In the Re-Order Level field, type the quantity of material when reached, the material is to be reordered.
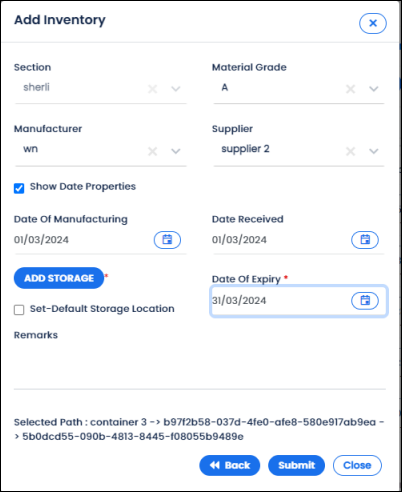
- Click Next. The dialog appears as shown in the figure:
- In the Sectionfield, select section to add material.
- In the Material Grade field, select the material grade.
- Select Manufacturerand Supplier of the material.
- If required, click to select the Show Date Properties check box. The Date of Manufacturing and Date Received fields appears. Select date of manufacturing and date of expiry of the material.
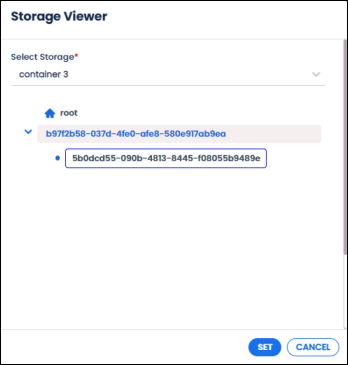
- Click ADD STORAGE. The Storage Viewerdialog appears as shown in the figure:
FIGURE: Storage Viewer Dialog
- Click to check the Set- Default Storage Location option to store the material in the default storage location. Or to select a storage location to store the sample, in the Select Storage field, select the storage location for the inventory. You can see the storage structure appear. Select the node where you want to store the material and then click SET. You can see the Selected Path appear in the Add Inventory
- In the Date of Expiryfield, select the date of expiry of the material.
- In the Remarksfield, type remarks if any.
- Click SAVE.
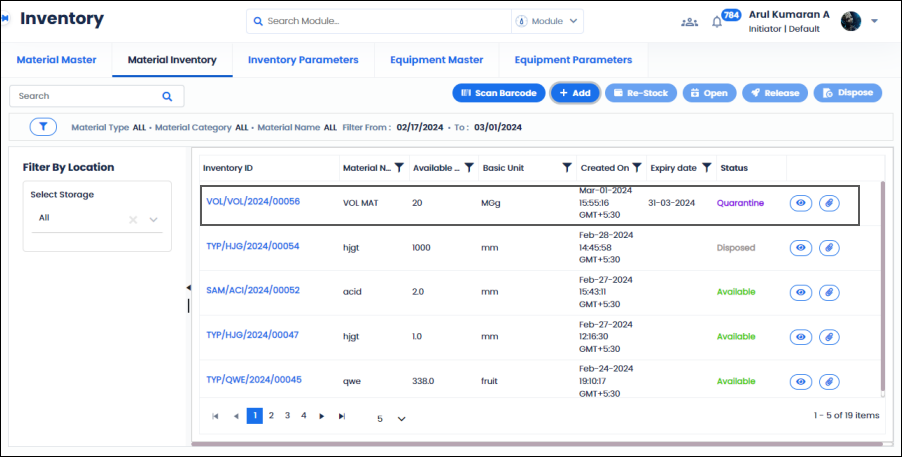
The material is added to the inventory and the same is listed in the Material Inventory tab as shown in the figure:
FIGURE: Material Added to the Inventory
By default, the material will appear in Quarantine status until it is released.
The material record will appear with 
 options.
- Click to view material details.
- Click to attach files to the material.
1.2.2 Viewing Inventory Details
To view inventory details, follow these steps:
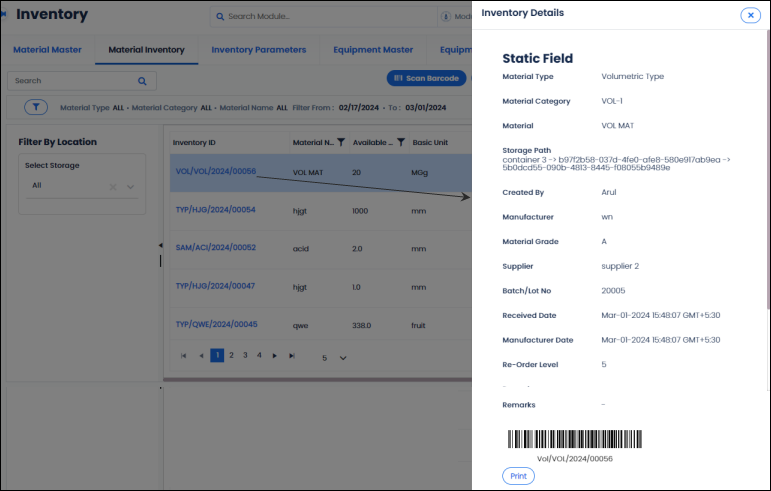
- In theInventory IDfield, click on an inventory id to view its details. The Inventory Details dialog appears as shown in the figure:
FIGURE: Viewing Inventory Details
You can see the inventory details and the barcode generated for the inventory.
1.2.3 Viewing Transaction History of the Selected Inventory
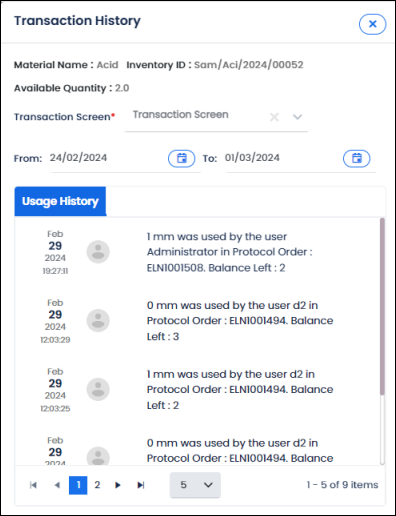
- Click of a material inventory record to view its transaction history. The details appear as shown in the figure:
FIGURE: Viewing Material Details
You can see the material name, inventory id, available quantity. In the Transaction Screen field, select a transaction screen. Under Usage History, you can view the list of transactions with the material used in the selected transaction screen.
1.2.4 Set Open Date for the Inventory
You must set an open date for the inventory if the Open Expiry option is set for the material while adding the material in the Material master. If the material is in Quarantine status, the material must be released and then material must be opened.
To set open date for the material, follow these steps:
- Select inventory and then click Open . The Open Date dialog appears as shown in the figure:
FIGURE: Open Date Dialog
- Select the date and then click SAVE. The inventory expires as mentioned in the Expiry Validationsin material master.
1.2.5 Release Inventory
If the inventory status is Quarantine, then you must release the inventory for use.
- Select the inventory and then click Release. The status changes to" Available".
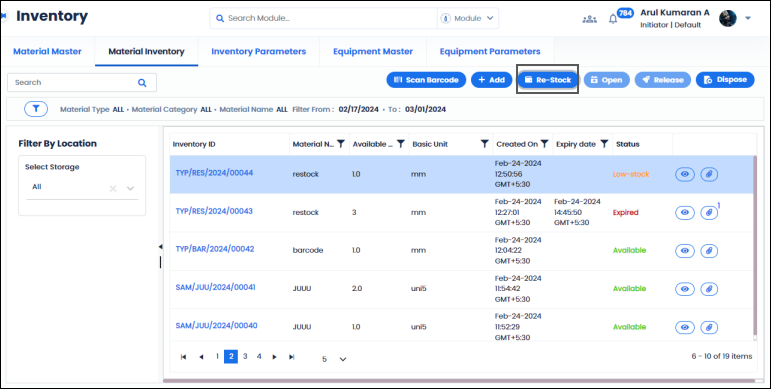
1.2.6 Re-Stock Inventory
When the status of the material appears as Low stock , you can re-stock the material.
- To re-stock the material, select an inventory in low-stock status and then click Re-Stockas shown in the figure:
FIGURE: Re-Stock Inventory
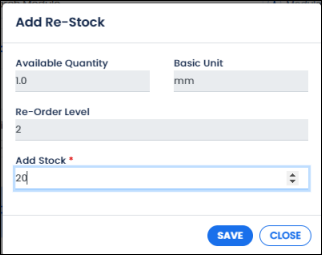
The Add Re-Stock dialog appears as shown in the figure:
FIGURE: Add Re-Stock Dialog
- In the Add Stockfield, select quantity of material to add.
- Click SAVE.
A new batch of the material is added with a new inventory id.
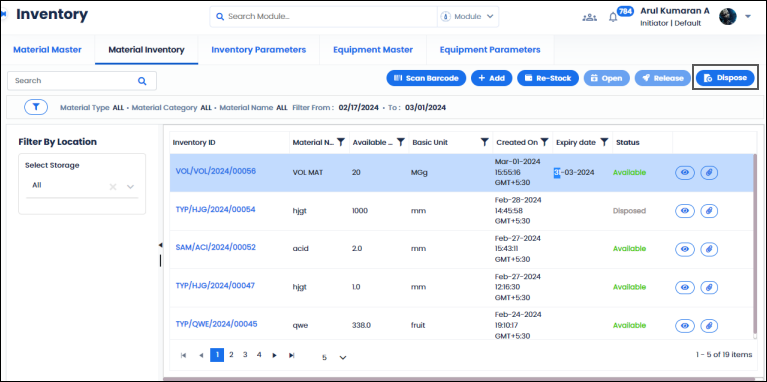
1.2.7 Dispose Inventory
To dispose an inventory, follow these steps:
- Select an inventory from the grid and then click Disposeas shown in the figure:
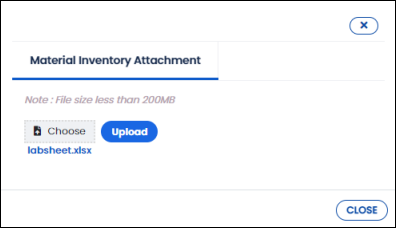
1.2.8 Attach File to Inventory
You can attach the file to the inventory. To do so, follow these steps:
- Select the inventory and then click The Material Inventory Attachment dialog appears as shown in the figure:
FIGURE: Material Inventory Attachment Dialog
- Click Choose, select a file to attach and then click Upload. The file is attached to the inventory.
1.3 Inventory Parameters
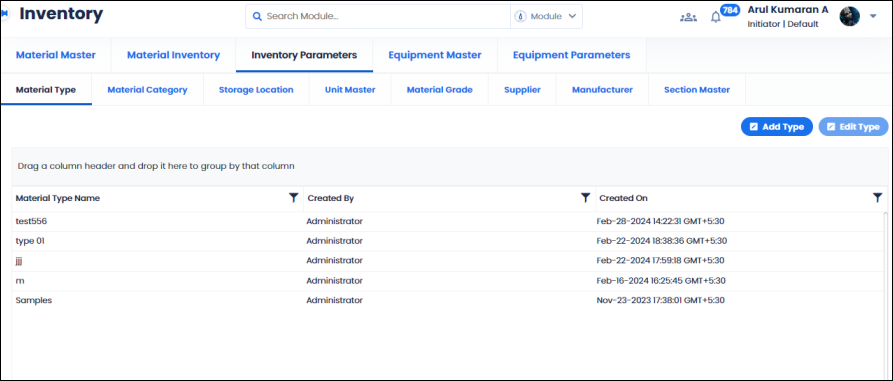
1.3.1 Material Type
Material Types are used to group materials based on their type.
1.3.1.1 Add Material Type
To add a material type, follow these steps:
- On the main menu, click and then click Inventory Parameters. The Material Type master tab appears as shown in the figure:
FIGURE: Material Type Master
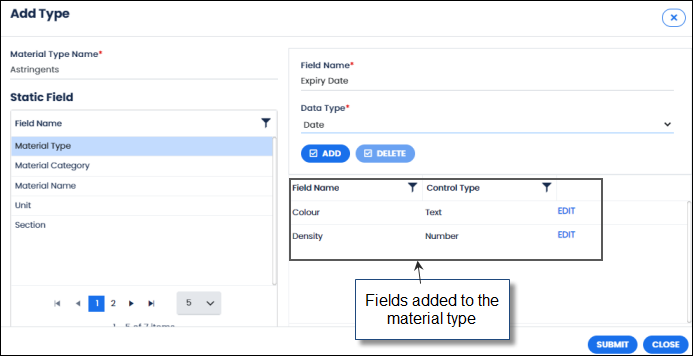
- Click Add Type. The Add Typedialog appears as shown in the figure:
FIGURE: Add Type Dialog
- In the Material Type Namefield, type the material name you want to add. You can add fields to the material type you add.
- In the Field Nametype the field name you want to add.
- In the Data Typefield, select data type for the field. The data type can be Text / Number / Date / Combo box. For Combo box, in the Enter Combo Box Value dialog, type the values for combo box separated by comma.
- Click ADD. The field is added to the list and appears with EDIT You can add multiple fields to the material type.
- To edit a field, click EDIT. The field appears in the Field Name. Edit field name and data type and then click UPDATE.
- To delete a field, select a field from the list and then click DELETE.
- Click SUBMIT. The material type is added to the material type master.
1.3.1.2 Edit Material Type
- To edit material type, on the Material Type master screen, select a material type and then click Edit Type. The Edit Typedialog appears.
- You cannot edit Material Type name. You can add or edit fields and then click SUBMIT .
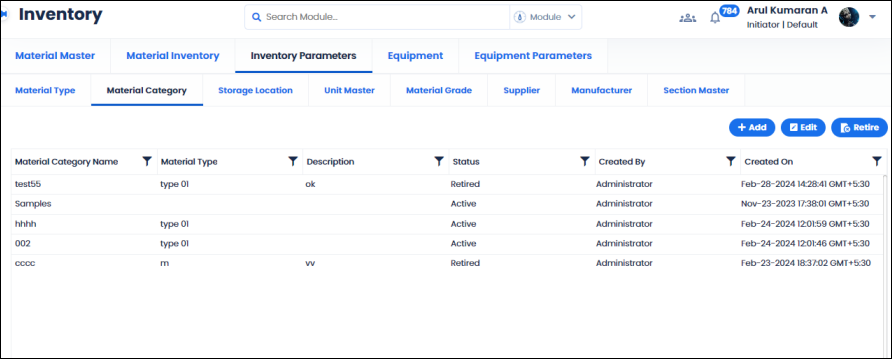
1.3.2 Material Category Master
Material Category master is used to add and manage material categories. Material category is used in various forms and master’s to group materials.
To create a new material category, follow these steps:
- On the main menu, click and then click Inventory Parameters. In the Inventory Parameters screen, go to the Material Category The Material Category tab appears as shown in the figure:
FIGURE: Material Category Tab
In the Material Category tab, you can see the list of material categories added and options to add, edit and retire material categories appears.
Note: For administrators the ActiveSite field will appear. Hence, administrator user can create site specific material categories.
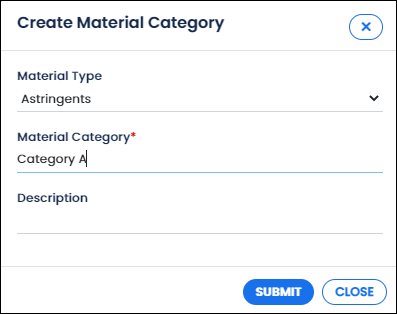
- Click The Create Material Category dialog appears as shown in the figure:
FIGURE: Create Material Category Dialog
- In the Material Typefield, select material type.
- In the Material Category field, type the name of the material category you want to add.
- Click SUBMIT.
You can see the material category you just added listed in the Material Category master.
To edit material category details, in the Material Category master screen, select the material category, and then click Edit. In the edit screen, do required changes and then click SUBMIT.
To retire a material category, in the Material Category master screen, select the material category you want to retire then click Retire.
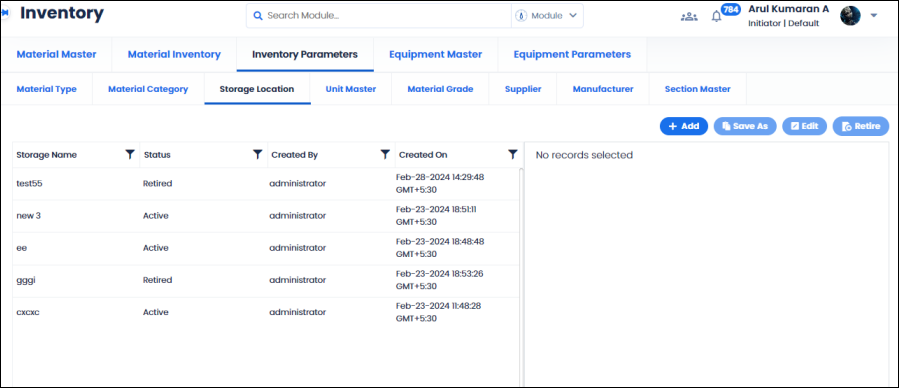
1.3.3 Storage location Master
Storage Location master is used to create and manage storage structures that are used to store samples.
To create a new storage location, follow these steps:
- On the main menu, click and then click Inventory Parameters. In the Inventory Parameters screen, go to the Storage LocationThe Storage Location master screen appears as shown in the figure:
FIGURE: Storage Location Master Screen
In the Storage Location master screen, you can see the list of storage locations added and options to add, edit and retire storage locations appear.
Note: For administrators the ActiveSite field will appear. Hence, administrator user can create site specific storage locations.
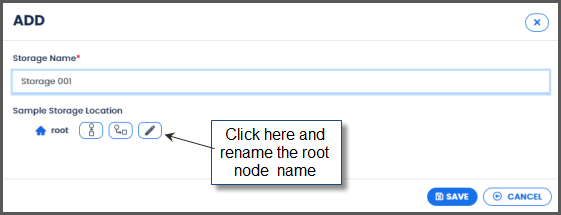
- Click The ADD dialog appears as shown in the figure:
FIGURE: Create Storage Location Dialog
- In the Storage Name field, type the name of the storage you want to add.
- In the Sample Storage Locationfield, the root node appears. Click
 and rename the root node.
- Click
 to add a parallel node.
 - Clic
 to add a child node.
 - Click and type the name for the node.
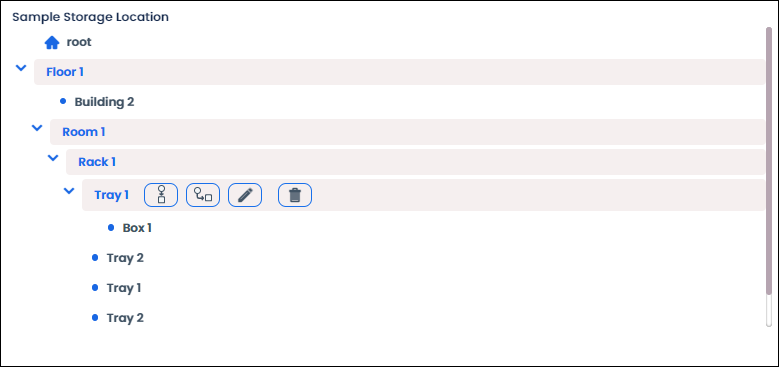
- Using the above options design the storage structure. For example, as shown in the figure:
FIGURE: Example Storage Structure Designed
- Click SAVE.
You can see the storage location you just added listed in the Storage Location master.
- To edit storage location details, in the Storage location master screen, select the storage location, and then click Edit. In the edit screen, do required changes and then click SUBMIT.
- To retire a storage location, in the Storage location master screen, select the storage location you want to retire then click
- Use the Save Asoption to create a storage location with same structure with minimal changes. Select a storage location and then click Save As. The ADD dialog appears. In the Storage Name field, type a name. Do required edits to the nodes and then SAVE.
1.4 Unit Master
Unit master is used to create and manage units that are used to measure samples/material etc.
To create a new unit, follow these steps:
- On the main menu, click and then click Inventory Parameters. In the Inventory Parameters screen, go to the Unit Master tab. The Unit Master screen appears as shown in the figure:
FIGURE: Unit Master
In the Unit Master screen, you can see the list of units added and options to add, edit and retire units appear.
Note: For administrators the ActiveSite field will appear. Hence, administrator user can create site specific units.
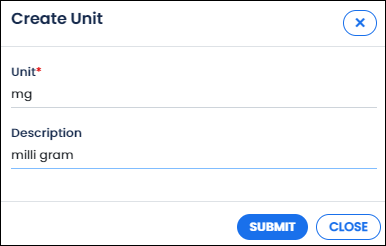
- Click AddTheAdd screen appears as shown in the figure:
FIGURE: Create Unit Dialog
- In the Unit field, type the name for the unit you want to add.
- In the Descriptionfield, type description for the unit.
- Click SUBMIT.
You can see the unit you created listed in the unit master.
Other options in Unit master screen
- Select a unit and then click Edit. In the edit screen do required changes and then click SUBMIT.
- To retire a unit, in the Unit Master screen, select the unit you want to retire, and then click
- Click Importto bulk import units from an Excel sheet.
- Click
 to export units in the unit master into Excel format to your local storage.
1.4.1 Material Grade Master
Material Grade master is used to add and manage material grade details. These material grades are used to grade materials.
To create a new material grade, follow these steps:
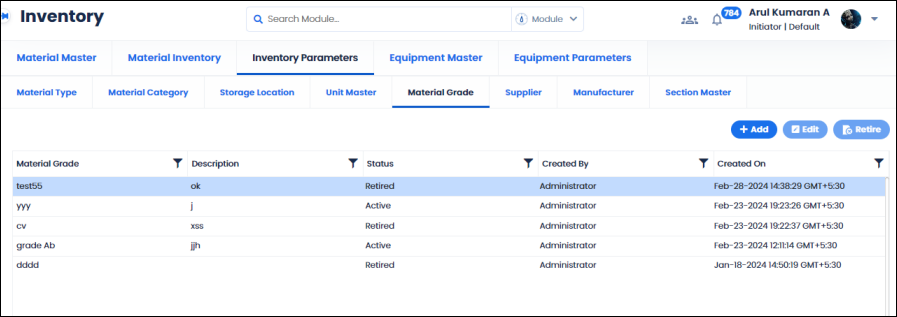
- On the main menu, click and then click Inventory Parameters. In the Inventory Parameters screen, go to the Material Gradetab. The Material Grade master screen appears as shown in the figure:
FIGURE: Material Grade Master Screen
In the Material Grade master screen, you can see the list of material Grades added and options to add, edit and retire material grades appears.
Note: For administrators the ActiveSite field will appear. Hence, administrator user can create site specific material grades.
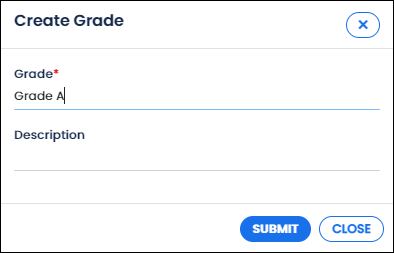
- Click The Add Material Grade dialog appears as shown in the figure:
FIGURE: Create Grade Dialog
- In the Grade field, type the name for the grade you want to add.
- In the Descriptionfield, type description about the grade.
- Click SUBMIT.
You can see the material grade you just added listed in the Material Grade master.
- To edit material grade details, in the Material Grade master screen, select the material grade, and then click Edit. In the edit screen, do required changes and then click SUBMIT.
- To retire a material grade, in the Material Grade master screen, select the material grade you want to retire, and then click
1.5 Supplier Master
Supplier master is used to add and manage suppliers.
To create a new supplier, follow these steps:
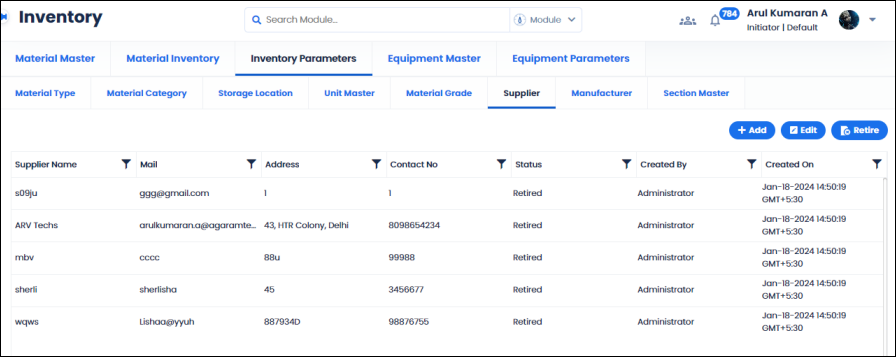
- On the main menu, click and then click Inventory Parameters. In the Inventory Parameters screen, go to the Suppliertab. The Supplier master screen appears as shown in the figure:
FIGURE: Supplier Master Screen
In the Supplier master screen, you can see the list of suppliers added and options to add, edit and retire suppliers appear.
Note: For administrators the ActiveSite field will appear. Hence, administrator user can create site specific suppliers.
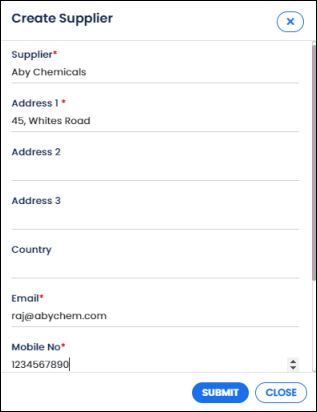
- Click The Create Supplier dialog appears as shown in the figure:
FIGURE: Create Supplier Dialog
- In the Supplier field, type the supplier’s name.
- Fill in other fields appropriately.
- Click SUBMIT.
You can see the supplier you just added listed in the Supplier master.
- To edit supplier details, in the Supplier master screen, select the supplier, and then click Edit. In the edit screen, do required changes and then click SUBMIT.
- To retire a supplier, in the Supplier master screen, select the supplier you want to retire then click
1.6 Manufacturer Master
Manufacturer master is used to add and manage manufacturer details.
To create a new manufacturer, follow these steps:
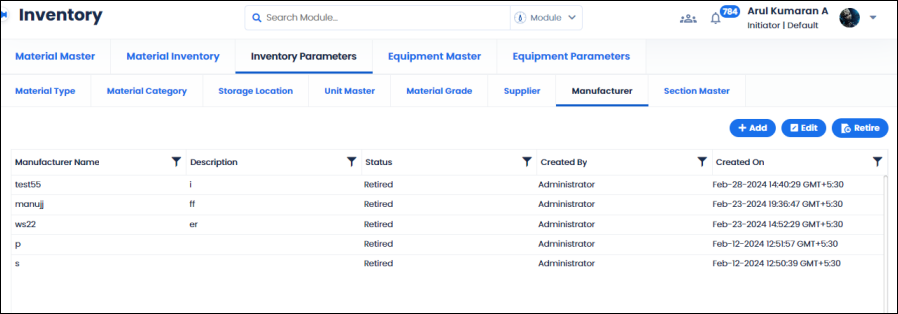
- On the main menu, click and then click Inventory Parameters. In the Inventory Parameters screen, go to the Manufacturertab. The Manufacturer master screen appears as shown in the figure:
FIGURE: Manufacturer Master Screen
In the Manufacturer master screen, you can see the list of manufacturers added and options to add, edit and retire manufacturers appears.
Note: For administrators the ActiveSite field will appear. Hence, administrator user can create site specific manufacturers.
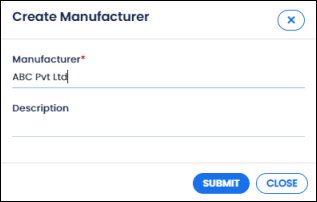
- Click Add. The Create Manufacturer dialog appears as shown in the figure:
FIGURE: Create Manufacturer Dialog
- In the Manufacturer field, type the name of the manufacturer you want to add.
- In the Description field, type description about the manufacturer.
- Click SUBMIT.
You can see the manufacturer you just added listed in the Manufacturer master.
- To edit manufacturer details, in the Manufacturer master screen, select the manufacturer, and then click Edit. In the Edit Manufacturer screen, do required changes and then click SUBMIT.
- To retire a manufacturer, in the Manufacturer master screen, select the manufacturer you want to retire, and then click
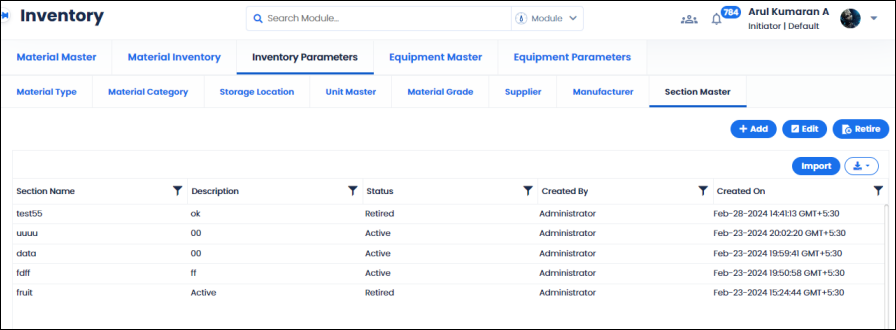
1.7 Section Master
Section master is used to add and manage sections. Sections are used to divide materials based on different departments in the organization.
To create a new section, follow these steps:
- On the main menu, click and then click Section and then click Inventory Parameters. In the Inventory Parameters screen, go to the Manufacturer The Section master screen appears as shown in the figure:
FIGURE: Section Master Screen
In the Section master screen, you can see the list of sections added and options to add, edit and retire sections appear.
Note: For administrators the ActiveSite field will appear. Hence, administrator user can create site specific sections.
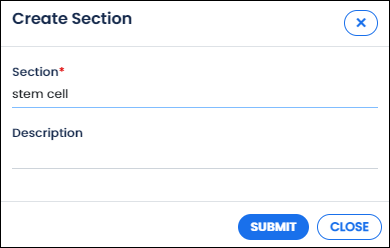
- Click The Create Section dialog appears as shown in the figure:
FIGURE: Create Section Dialog
- In the Section field, type the name of the section you want to add.
- In the Descriptionfield, type description about the section.
- Click SUBMIT.
You can see the section you just added listed in the Section master.
- To edit section details, in the Section master screen, select the section, and then click Edit. In the Edit Section dialog, do required changes and then click SUBMIT.
- To retire a section, in the Section master screen, select the section you want to retire then click
- Click Importto bulk import sections from an Excel sheet.
- Click to export sections in the section master into Excel format to your local storage.
1.8 Equipment Parameters
1.8.1 Equipment Type
Equipment Types are used to group equipment’s based on its type. To add an equipment type, follow these steps:
- On the main menu, click and then click Equipment Parameters. The Equipment Type master tab appears as shown in the figure:
FIGURE: Equipment Type Master
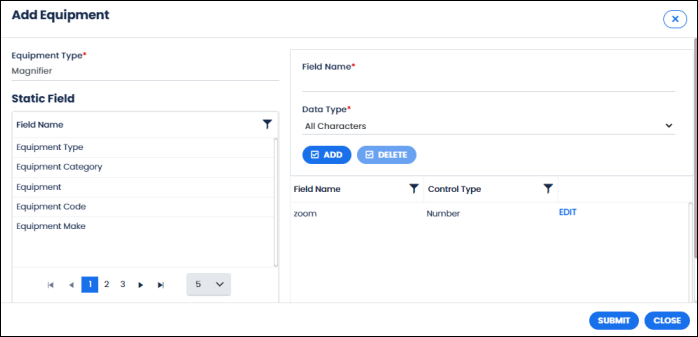
- Click Add Type. The Add Equipmentdialog appears as shown in the figure:
FIGURE: Add Equipment Dialog
- In the EquipmentType field, type the equipment type name you want to add. you can add fields to the equipment type you add.
- In the Field Name field, type the field name you want to add.
- In the Data Type field, select data type for the field. The data type can be Text / Number / Date / Combo box. For Combo box, in the Enter Combo Box Value dialog, type the values for combo box separated by comma.
- Click ADD .The field is added to the list. You can add multiple fields to the equipment type.
- To edit a field, click EDIT .The field appears in the Field Name. Edit field name and data type and then click UPDATE.
- To delete a field, select a field from the list and then click DELETE.
- Click SUBMIT. The equipment type is added to the equipment type master.
1.8.1.1 Edit Equipment Type
- To edit equipment type, on the Equipment Type master screen, select a equipment type and then click Edit Type. The Edit Equipmentdialog appears.
- You cannot edit Equipment Type name. You can add or edit fields and then click SUBMIT.
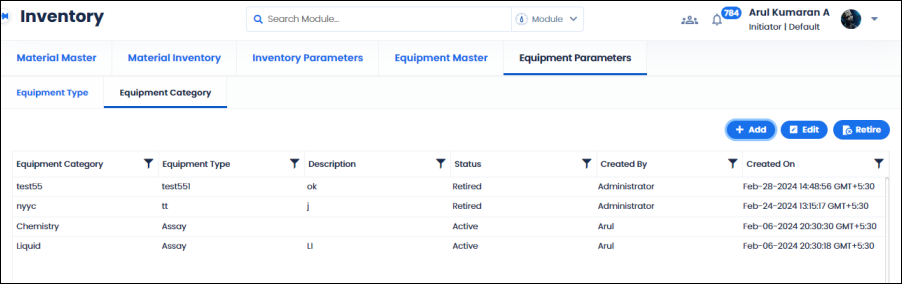
1.8.2 Equipment Category Master
Equipment Category master is used to add and manage equipment categories. Equipment category is used in various forms and master’s to group equipment’s.
To create a new equipment category, follow these steps:
- On the main menu, click and then click Equipment Parameters. In the Equipment Parameters screen, go to the Equipment Category The Equipment Category tab appears as shown in the figure:
FIGURE: Equipment Category Tab
In the Equipment Category tab, you can see the list of equipment categories added and options to add, edit and retire equipment categories appears.
Note: For administrators the ActiveSite field will appear. Hence, administrator user can create site specific equipment categories.
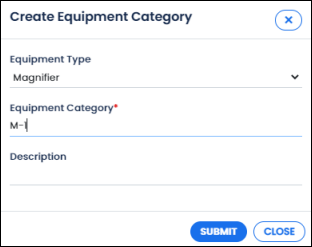
- Click The Create Equipment Category dialog appears as shown in the figure:
FIGURE: Create Equipment Category Dialog
- In the Equipment Typefield, select equipment type.
- In the Equipment Category field, type the name of the equipment category you want to add.
- Click SUBMIT.
You can see the equipment category you just added listed in the Equipment Category master.
- To edit equipment category details, in the Equipment Category master screen, select the equipment category, and then click Edit. In the edit screen, do required changes and then click SUBMIT.
- To retire an equipment category, in the Equipment Category master screen, select the equipment category you want to retire then click
1.9 Equipment Master
Equipment Master is used to add and manage equipment’s.
To add an equipment, follow these steps:
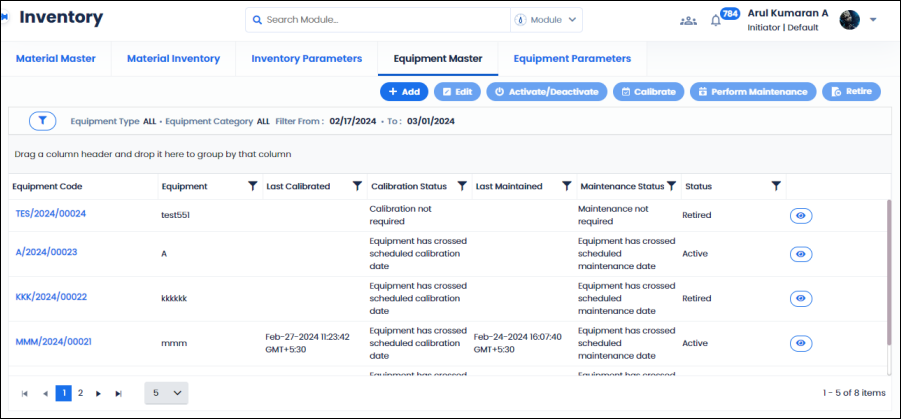
- On the main menu, click and then click Equipment Master. The Equipment Master tab appears as shown in the figure:
FIGURE: Equipment Master Screen
You can see the list of equipment’s added. Details such as last calibrated date, calibration status, last maintained date, maintenance status and status of the equipment appear.
By default, all material types and categories added for the last one week from all storage locations appear. You can see the status of the materials in different colors.
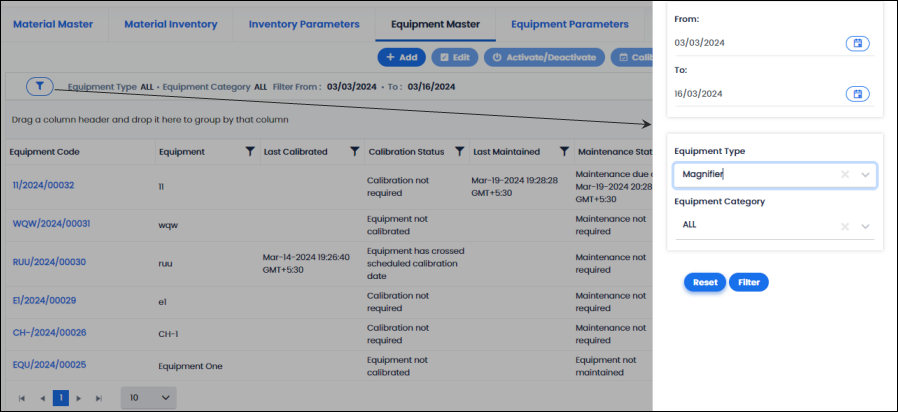
- You can choose filter options to search for equipment added. Click. The filter appears as shown in the figure:
FIGURE: Selecting Date Range, Equipment Type and Category to Search Equipment’s
- Select From and todates, Equipment Type, Equipment Category and then click Filter. Equipment is fetched for the selected filter options.
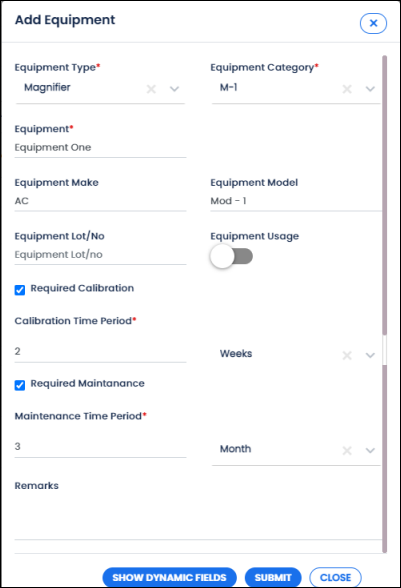
- Click Add. The Add Equipmentdialog appears as shown in the figure:
FIGURE: Add Equipment Dialog
- Select Equipment Typeand Equipment Category to add the equipment.
- In the Equipmentfield, type the name of equipment you want to add.
- Fill in the Equipment Make, Equipment Modeland Equipment Lot/No
- Click to check the Required Calibration The Calibration Time Periodfield appears. For example, select number and the period: Select 2 and Week. Then the equipment must be calibrated in 2 weeks.
- Click to check the Required Maintenance The Maintenance Time Period field appears. For example, select number and the period: Select 3 and Month. Then maintenance must be done for the equipment once in three months.
- In the Remarks field, type your remarks.
- Click SHOW DYNAMIC FIELDS The dynamic fields added appears as shown in the figure:
FIGURE: Filling Dynamic Fields
- Fill in the dynamic field. And then click SUBMI
The equipment is added to the master.
- Select an equipment from the list and then click Edit. In the Edit Equipmentdialog, do required edits and then click SUBMIT.
- To activate or deactivate an equipment, select an equipment from the list and then click Activate/Deactivate. You cannot retire deactivated equipment.
- To retire an equipment, select an equipment from the list and then click Retire.
- To calibrate an equipment, select the equipment from the list and then click Calibrate.
- To perform maintenance to an equipment, select an equipment from the list and then click Perform Maintenance.
- Click to view usage history, calibration history and maintenance history of the equipment.
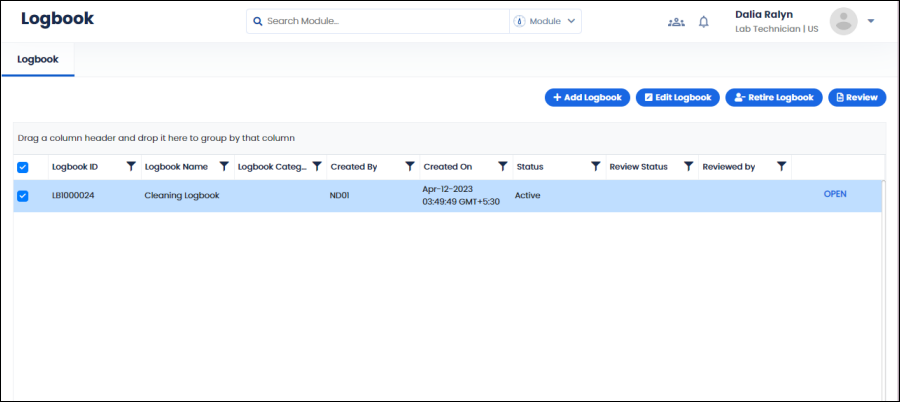
1.10 Logbook
Logbook is a record used to record states, events, and tasks or work applicable to Logilab ELN.
ELN enables you to design your own logbook and record events.
Note: For administrators the Site field will appear. Hence, administrator user can create site specific logbooks.
To create a new logbook, follow these steps:
- On the main menu, click
 The Logbook screen appears as shown in the figure:
FIGURE: Logbook Screen
Note: For administrators the Site Master field will appear. Hence, administrator user can create site specific projects.
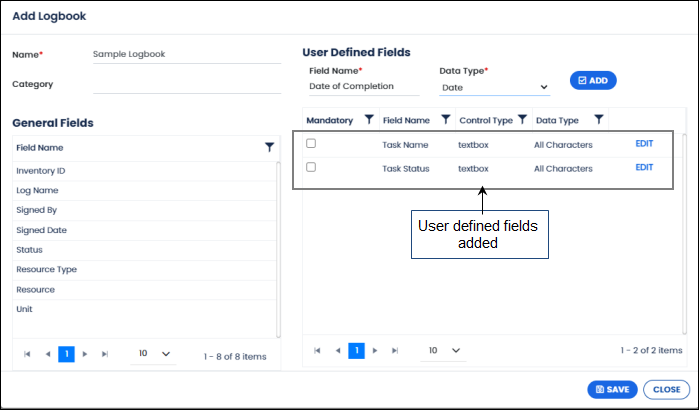
- Click Add Logbook. The Add Logbook dialog appears as shown in the figure:
FIGURE: Add Logbook Dialog
- In the Name field, type the name for the logbook.
- In the Category field, type category of the logbook.
You can see the list of general fields on the right side. In addition, you can add your own fields under User Defined Fields.
- Under User Defined Fields, in the Field Name field, type the field name you want to add.
- In the Data Type field, select a data type for the field:
- All Characters: Allows text and number.
- Text: Allows text values.
- Number: Allows numeric values.
- Date: Allows select date
- Combo box: Allows select value from the given values separated by comma
- Click ADD. The field is added as shown in the above figure.
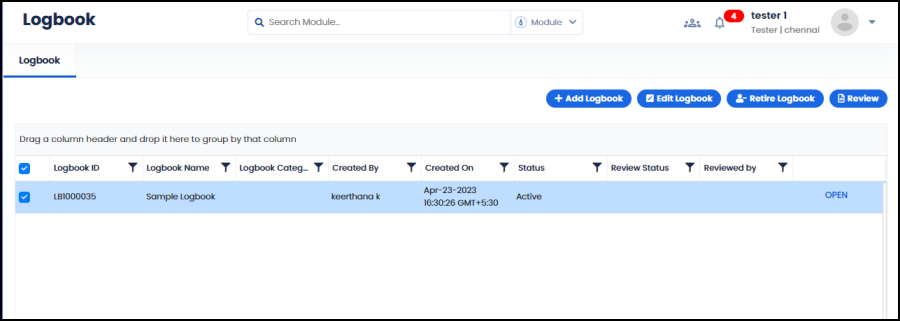
- Click SAVE. The logbook is created and appears as shown in the figure:
FIGURE: Logbook Created
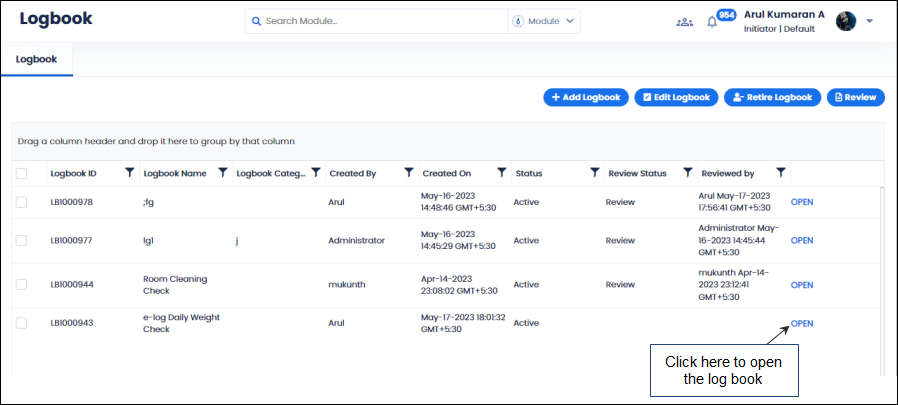
Once you create a logbook, you can add log/records to the logbook. To do so, follow these steps:
- On the Logbook screen, select the logbook and then click OPENas shown in the figure:
FIGURE: Opening Logbook
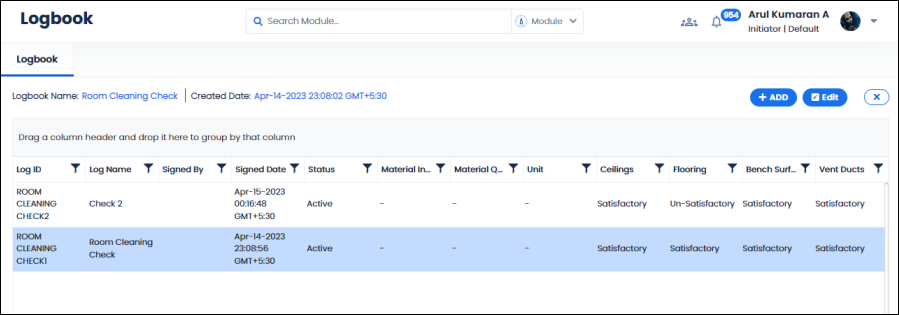
The Logbook screen opens, and you can see the ADD and Edit options appear as shown in the figure:
FIGURE: Opened Logbook
By default, the Edit option is disabled. When you select a logbook record, the Edit option is enabled.
- Select a logbook record and then click Editto update details.
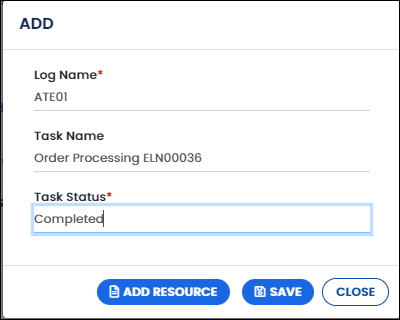
- Click ADDto add a log. The ADD dialog appears as shown in the figure:
FIGURE: ADD Log Dialog
- You can see the user defined fields appear. Fill in the fields.
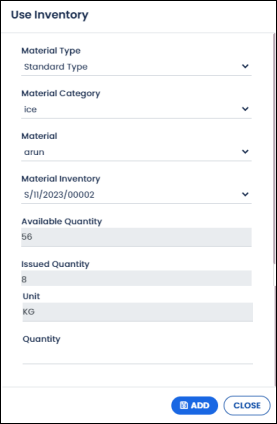
- Click ADD RESOURCEto add resource if required. The Use Inventory  ;dialog appears. Select the Material Type, Material Category. and Material. The Use Inventory dialog appears as shown in the figure:
FIGURE: Use Inventory Dialog
If the inventory is available and issued, then the details appear as shown in the above figure. You can use material from the Issued Quantity.
- In the Quantity field, type quantity of material required and then click ADD.
- Click SAVE. The log is added to the logbook and appears in the grid.
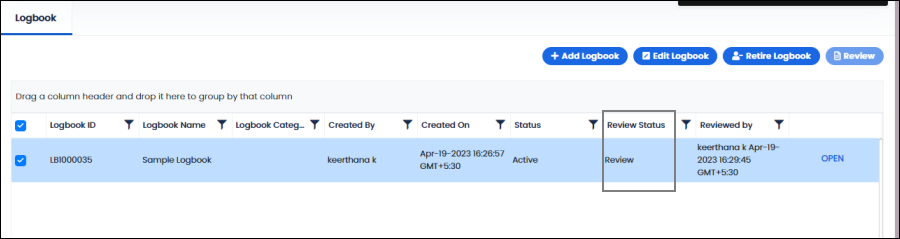
1.1.1 Reviewing Logbook
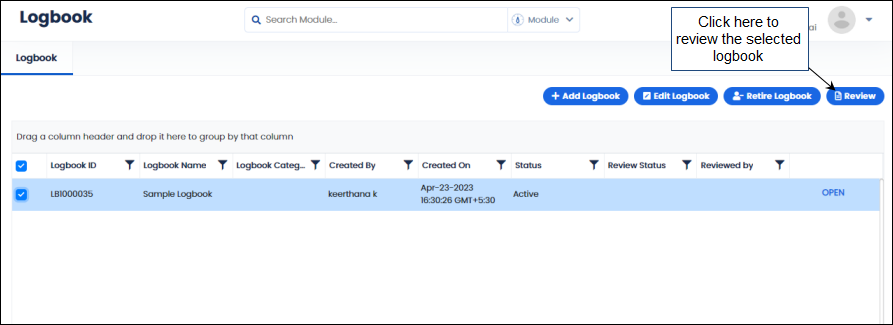
You can review the logbook as shown in the figure:
FIGURE: Reviewing Logbook
- Select the logbook to review and click Review as shown in the above figure:
- In the Audit Trail dialog, type your password, comments and then click Submit. The Review Status of the logbook changes to Review  ;as shown in the figure:
FIGURE: Reviewed Logbook