Each protocol will include the purpose of the test, any pre-requisites that need to be done before testing, and the acceptance criteria for the test. Each protocol is made up of a series of sections. Each section can have the following:
Steps: Series of steps to carry out a procedure/test.
Text: Type the purpose of the test, any pre-requisites required etc. for the test.
Image: Insert reference image.
Attachments: Enables attach files related to the step in the protocol.
Labsheet: Enables insert a labsheet to the step.
Resource: Enables add resources from inventory for the protocol.
Well plate: Enables add a well plate to the step.
Multi-Step Procedure: Helps to add a procedure that has a series of steps.
Chemical Drawing: Enables add chemical formula. Works like the chemical formula section in the lab sheet.
Grid: Helps add tables to the protocol step.
Signature: Enables capture e-signature of the current user.
Checklist: Enables checklists to add input to the test step.
To create a protocol template, follow these steps:
 and then click Protocol Templates. The Protocol Templates screen appears as shown in the figure:
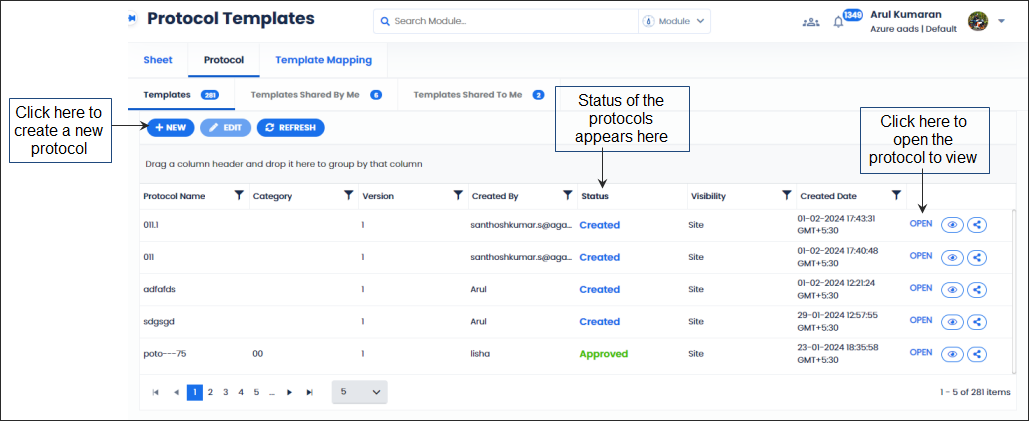
FIGURE: Protocol Templates Screen
You can edit a protocol that is in the Created status. You can edit the protocol name, category, and visibility of the protocol. You cannot edit a protocol in any other status.

FIGURE: Create New Protocol Dialog
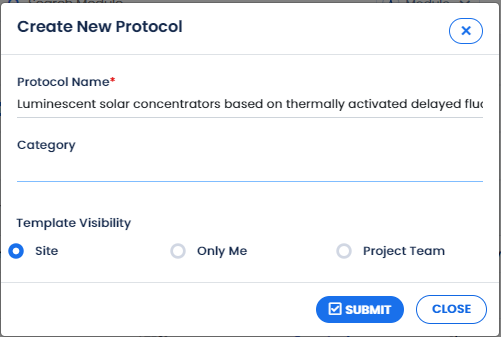
FIGURE: Adding Abstract to the Protocol
Note: Other tabs in the protocol:
Resources: This tab enables you to add resources / materials and equipements required for this protocol. You can also create a materia at run-time.
References:This tab enables you to add reference links, citations, protocols, Attachments, files, SOPs etc to the protocol.
Results: Enables to add / import results from the sections/steps in the protocol. You can add editors as you add in the Steps tab to add results.
 A new section is added and prompts for a name. Type name for the section.
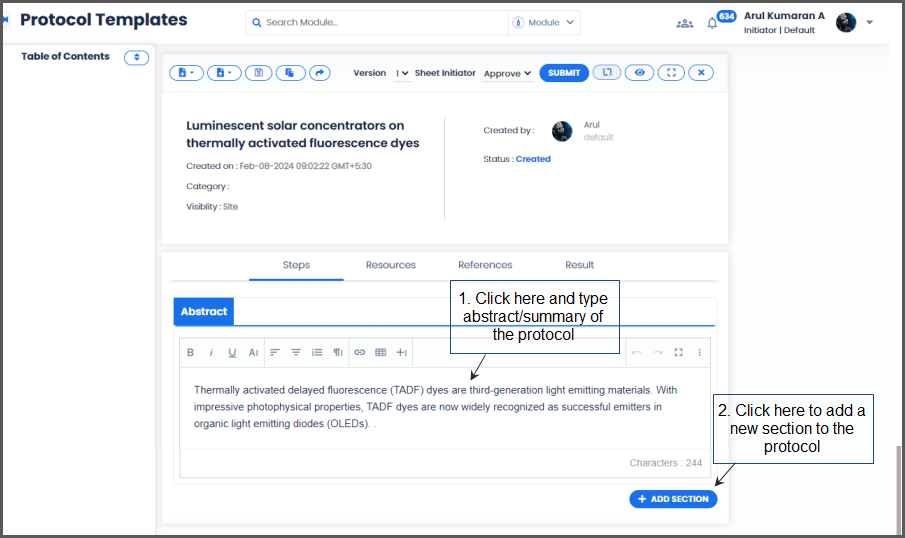
FIGURE: New Section Added to the Protocol
 to add a new step to the section. The screen appears as shown in the figure:
FIGURE: Adding New Step to the Protocol Section
 and then select any one of the following to add content to the step:
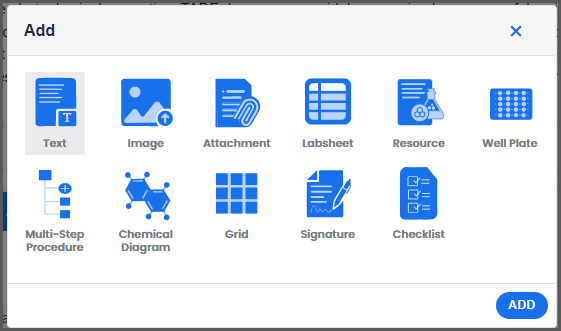
| Feature | Description |
|---|---|
 Bold/Italics/Underline Bold/Italics/Underline | Format text using bold or italics |
 | Click to view more font options |
 Subscript Subscript | Use to add subscript |
 Superscript Superscript | Use to add superscript |
 Strikethrough Strikethrough | Use to strike through the text |
 Font Family Font Family | Use to change font |
 Font Size Font Size | Use to change font size |
 Text Color Text Color | Use to change text color |
 Background Color Background Color | Use to change background color |
 Inline Class Inline Class | Select text, click and then select Code,Highlighted, orTransparent to highlight the text |
 Inline Style Inline Style | Select text, click and then select Big Red orSmall Blue to highlight the text in large red font or small blue font |
| Use to clear formatting | |
 | Click to view more paragraph alignment options |
 Align Left Align Left | Use to align selected text to the left |
 Align Center Align Center | Use to align selected text center |
 Align Right Align Right | Use to align selected text to the right |
 Justify Justify | Use to justify selected text |
 Ordered List Ordered List | Use to create a numbered list |
 Unordered List Unordered List | Use to create a bulleted list |
 Paragraph Format Paragraph Format | Use to change the format of the text using predefined styles |
 Paragraph Style Paragraph Style | Use to change the format or highlight the text using predefined styles |
 Line Height Line Height | Use to change space between selected text lines |
 Decrease Indent Decrease Indent | Use to decrease indent |
 Increase Indent Increase Indent | Use to increase indent |
 Quote Quote | Use to select and highlight the text |
 Link Link | Use to insert a link or URL |
 Insert Table Insert Table | Use to insert a table |
 Special Characters Special Characters | Use to add special characters |
 Undo & Redo Undo & Redo | Use to undo and redo actions |
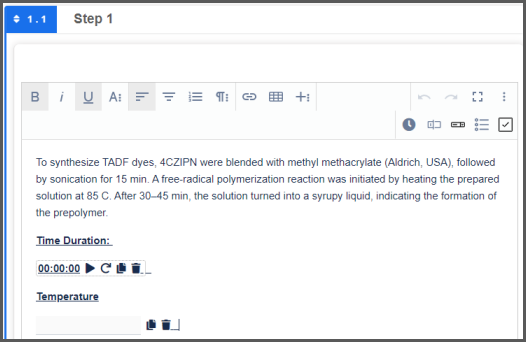
 Timer Timer | Add a timer to calculate the time taken to do a certain task, process, or step.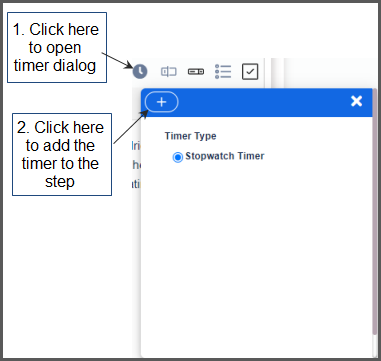 |
 Textbox Textbox | Use to add text, number, date, datetime, or color. You can add a small, medium, or large textbox.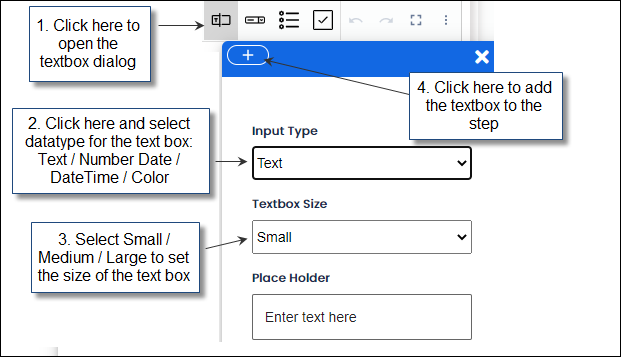 |
 Radio Button Radio Button | Use to add a radio button. |
 Dropdown Dropdown | Use to add a dropdown list. You can add a small, medium, or large dropdown. 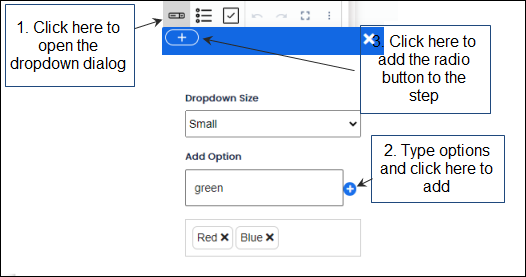 |
 Checkbox Checkbox | Use to add a checkbox to the step. 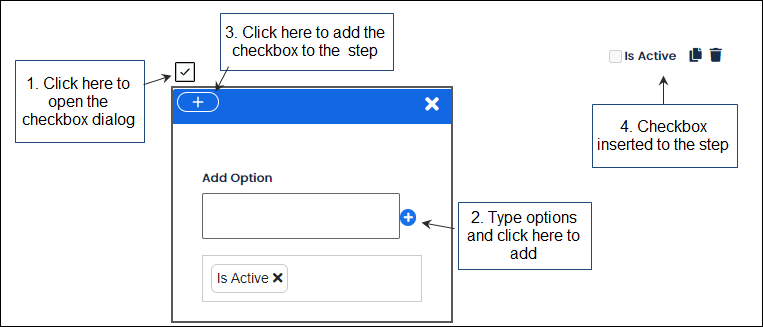 |
Table: 6 - Creating a Protocol Step –Using Common Text Editor Features
In the ADDdialog select Image as shown in the figure and then click ADD: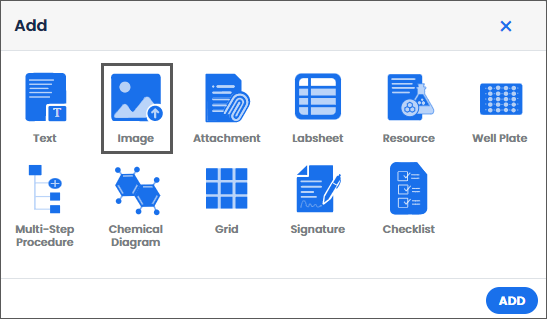
FIGURE: Inserting Image to the Protocol Step
The Image editor is inserted and appears as shown in the figure:
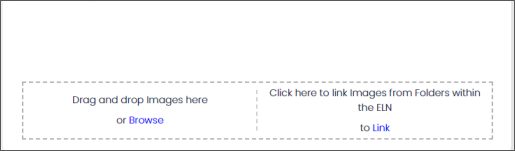
FIGURE: Image Editor
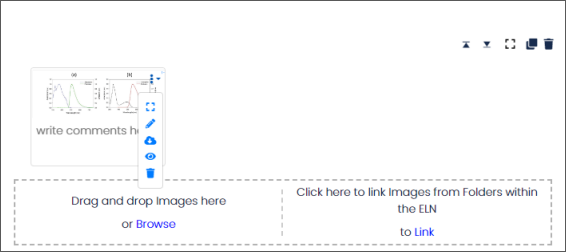
FIGURE: Image Added to the Protocol Step
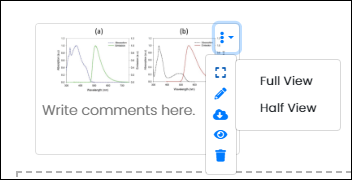
FIGURE: Using Full View / Half View Options
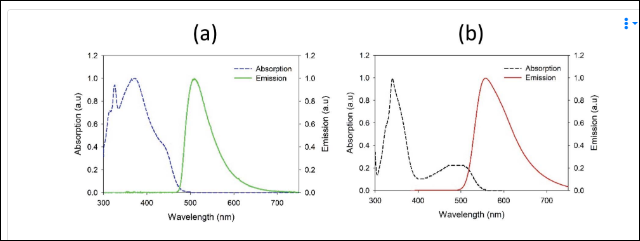
FIGURE: Image Added to the Protocol Step - Full View
To add an attachment to the protocol step, follow these steps:
click. In the ADDdialog select Attachment as shown in the figure and the click ADD: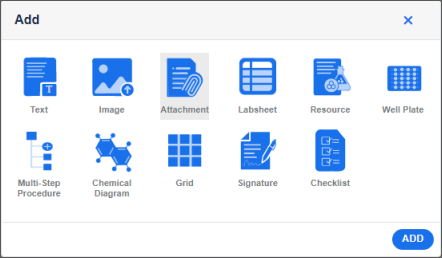
FIGURE: Add Dialog Showing Selecting Attachment Option
The attachment editor appears as shown in the figure:

FIGURE: Attachment Editor
You can browse and select a file from your local storage to attach / Drag and drop the file.
Or link files within the ELN.
Attach a file from your local storage:
Link files within ELN.
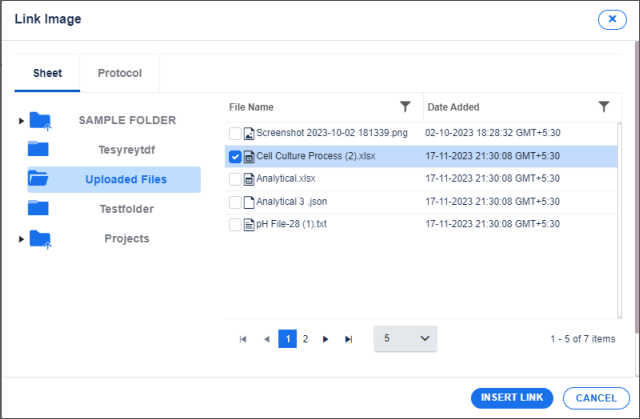
FIGURE: Link Attachment Dialog
You can see two tabs. Sheet and Protocol.

FIGURE: File Attached / Linked
To add labsheet to the protocol step, follow these steps:
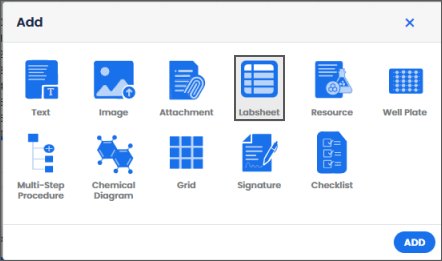
FIGURE: Add Dialog Showing Labsheet Option
The Labsheet editor is added as shown in the figure:
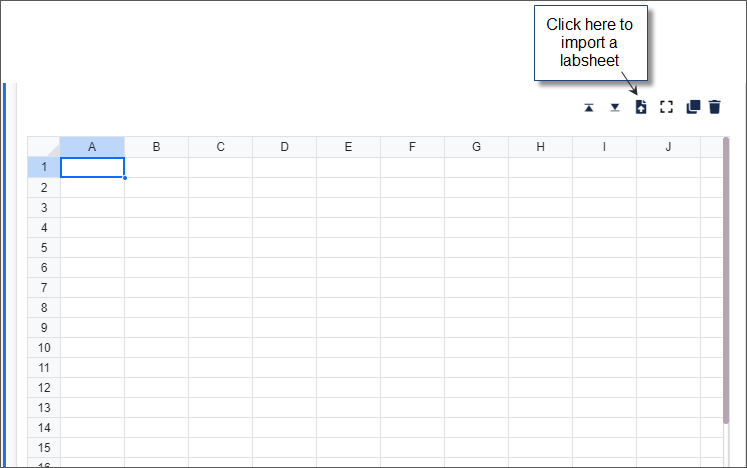
FIGURE: Added Labsheet Editor
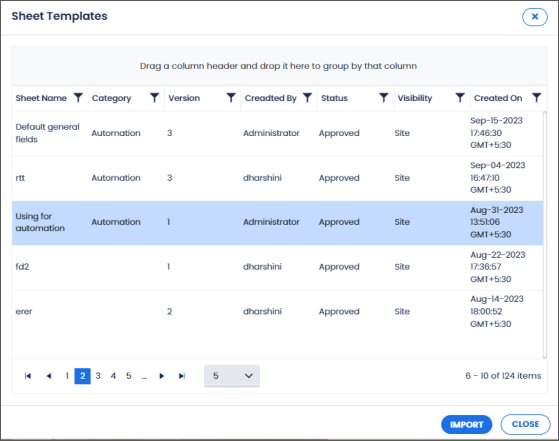
FIGURE: Sheet Templates Dialog
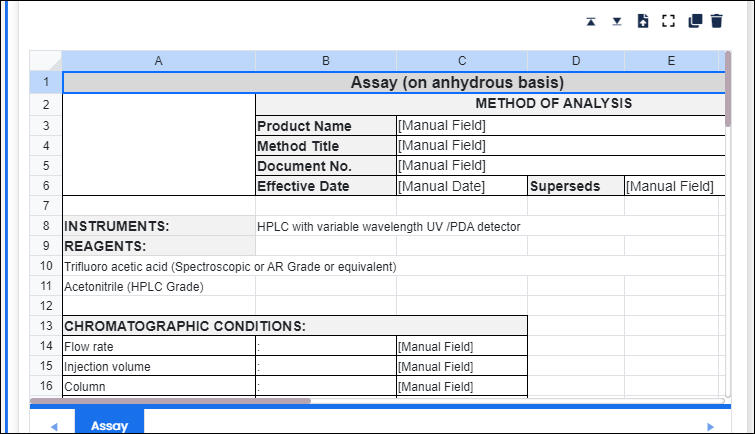
FIGURE: Imported Labsheet
The Resource editor helps you to do the following to the protocol step:
To add resource, follow these steps:
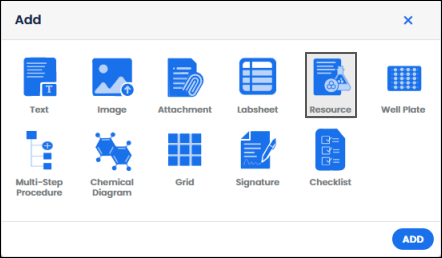
FIGURE: Add Dialog Showing Resource Option
Resource editor is added as shown in the figure:

FIGURE: Resource Editor Added
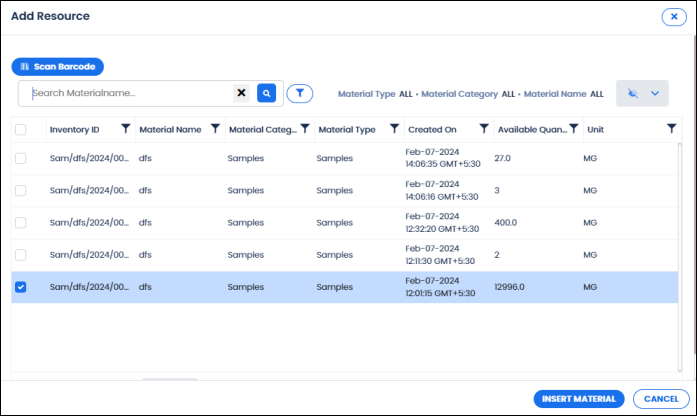
FIGURE: Add Resource Dialog
The selected inventories are added to the protocol step and appears as shown in the figure:
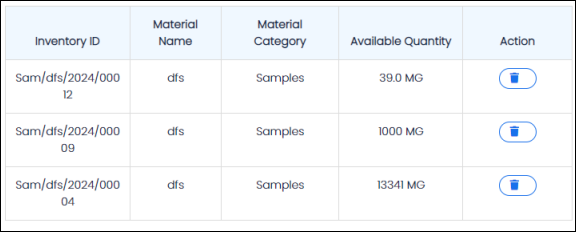
FIGURE: Inventory Added to the Protocol Step
You can see the inventory added and available quantity in the inventory after adding the inventory to the protocol step.
 Action column, clickto delete the inventory added.
Same way, add material and equipment to the protocol.
The Well Plate editor helps you to add well plate to the protocol step.
To add a well plate, follow these steps:
the ADDdialog select Well plate, in the Plate size field, select plate size as shown in the figure and then click ADD: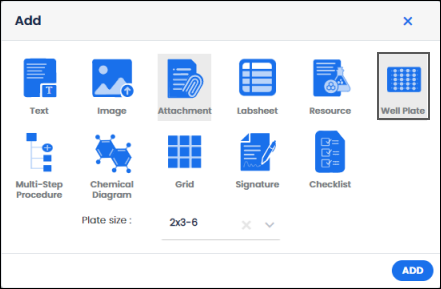
FIGURE: Add Dialog Showing Well Plate Option
The Well Plate editor is added as shown in the figure:
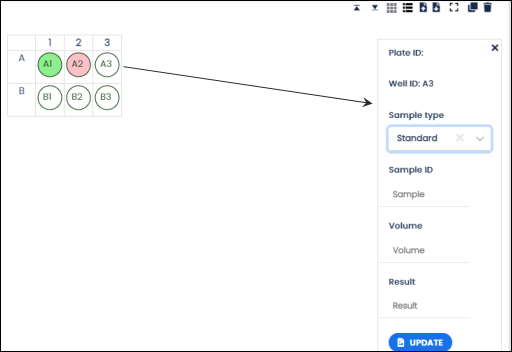
FIGURE: Well plate Added
Click on a well id to view its properties as shown in the above figure. You can select sample type to store, volume and result. The well plates are color coded. Based on the selected sample type the color of the well plate appears as shown in the above figure.
 view the well plate in list view as shown in the figure:
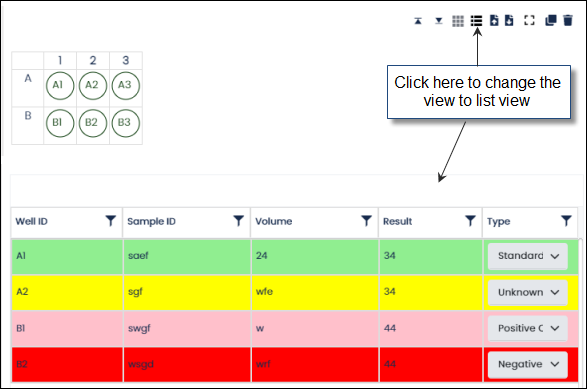
FIGURE: Well Plate - List View
 to import well plate data from Excel file.
  to export well plate data to the local storage in Excel format.
The multi step procedure editor helps you to add multi step procedure to the protocol step. When a step in the protocol section has sub-steps to be carried to complete the main step, you can use the multi-step procedure editor.
To add a multi-step procedure, follow these steps:
In the ADDdialog select Multi-Step Procedure as shown in the figure and then click ADD: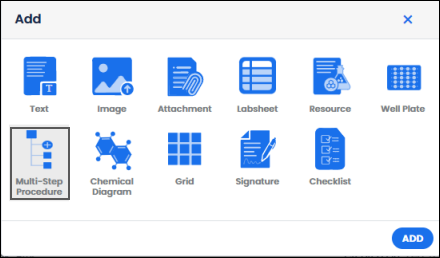
FIGURE: Add Dialog Showing Multi-Step Procedure Option
The Multi-Step Procedure editor is added as shown in the figure: Follow the onscreen instruction to add steps to the multi-step procedure:
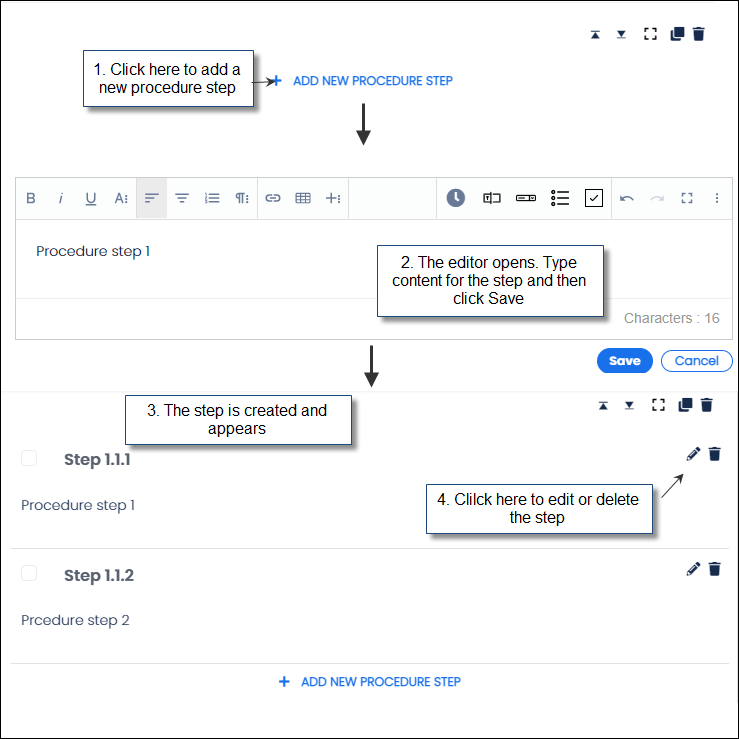
FIGURE: Creating a Multi-Step Procedure
The Chemical Diagram editor helps you to add chemical diagram to the protocol step.
To add a chemical diagram, follow these steps:
In the ADDdialog select Chemical Diagram as shown in the figure and then click ADD: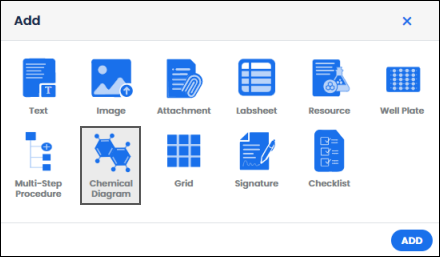
FIGURE: Add Dialog Showing Chemical Diagram Option
The Chemical Diagram editor is added as shown in the figure:
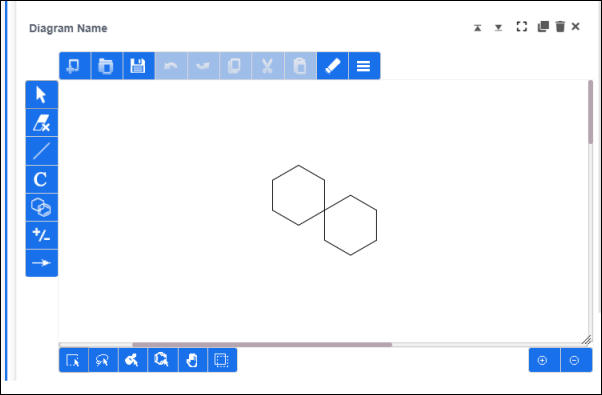
FIGURE: Chemical Diagram Editor
The grid editor helps you to add tables to the protocol step. The grid editor enables you to do the following:
To add a grid, follow these steps:
In the ADDdialog select Grid as shown in the figure and then click ADD: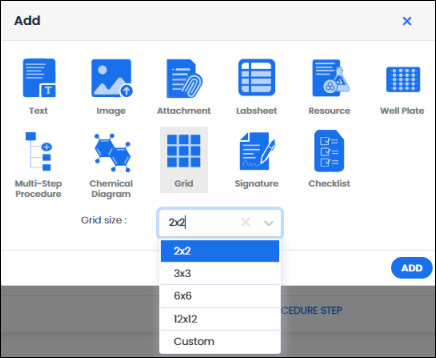
FIGURE: Add Dialog Showing Grid Option
The grid editor is added as shown in the figure:
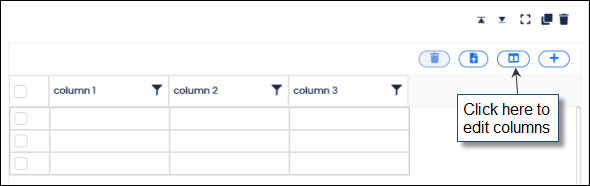
FIGURE: Grid Editor
 to edit the columns in the grid.
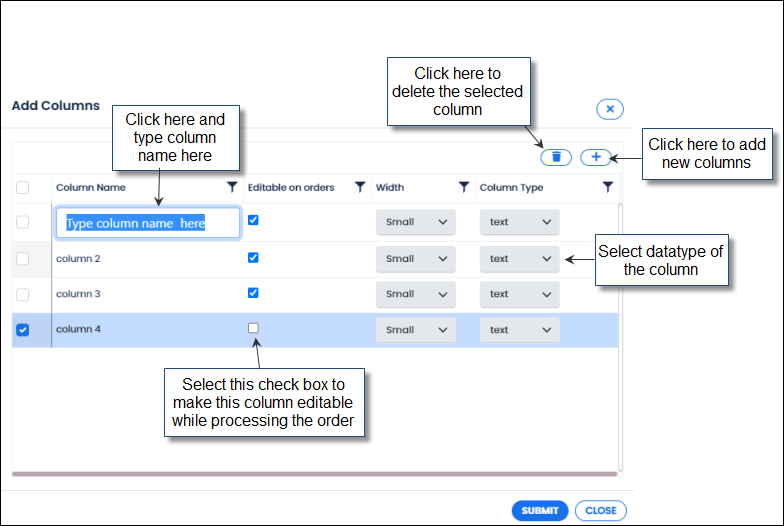
FIGURE: Grid Editor
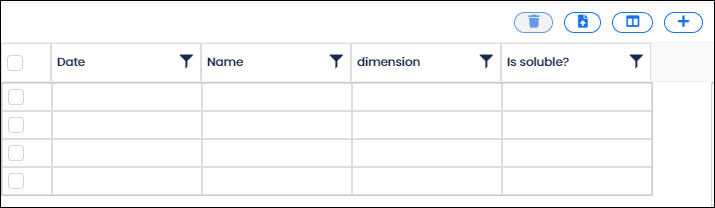
FIGURE: Table Added to the Step
 to add a new row to the table.
 to import data to the table.
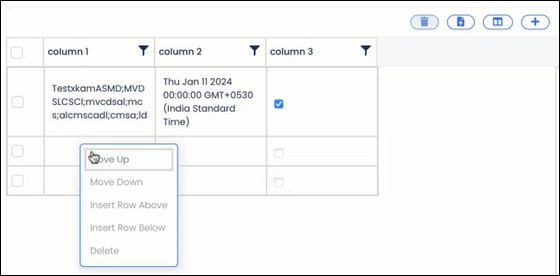
FIGURE: Using Right-Click Options
You can add your digital signature to a protocol step. To do so, follow these steps:
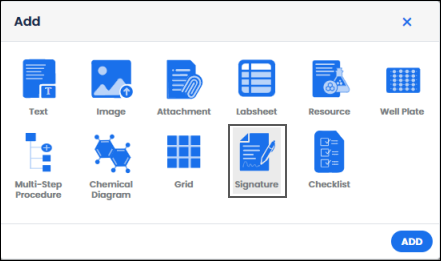
FIGURE: Add Dialog Showing Signature Option
The Signature editor is added as shown in the figure:


FIGURE: E-Signature Dialog
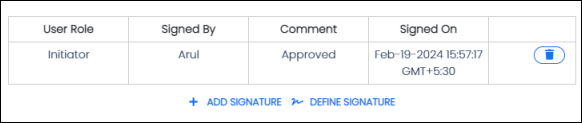
FIGURE: E-Signature Added
You can define a signature to demand a user signature in a protocol step. For example, if you want the QA Manager to approve the protocol step, then you can define a signature as follows:
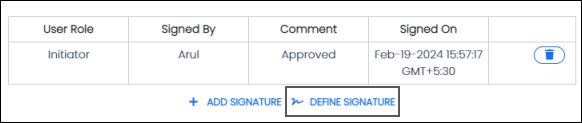
FIGURE: Using the Define Signature Option
The Define Signature dialog appears as shown in the figure:
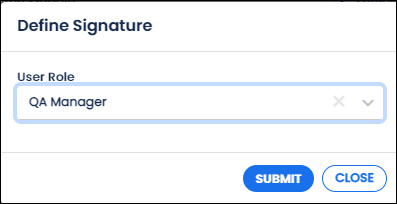
FIGURE: Define Signature Dialog
FIGURE: Signature Defined
At runtime, to complete the step the selected user must add their E-signature. You can define multiple signatures for a step.
To create a checklist, follow these steps:
In the ADDdialog select Checklist as shown in the figure and the click ADD: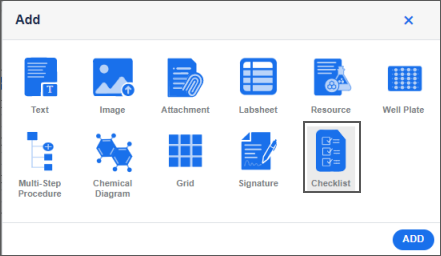
FIGURE: Add Dialog Showing Selecting Checklist Option
The appears as shown in the figure: Follow the onscreen instructions to create the checklist.
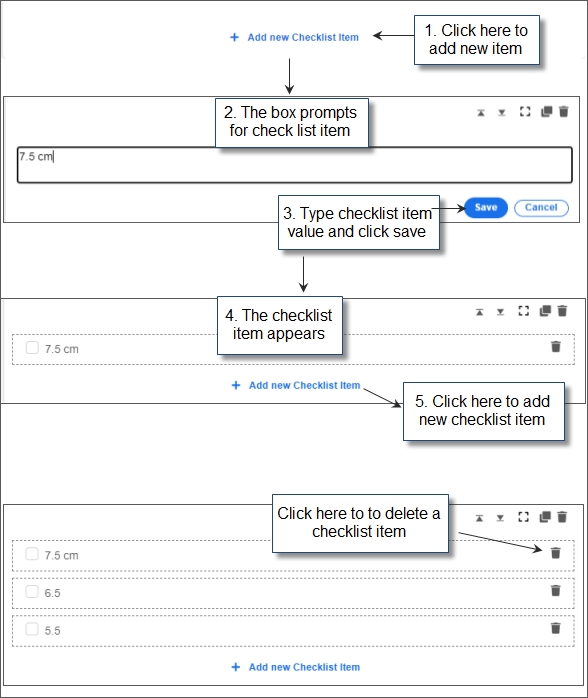
FIGURE: Adding Checklist to the Protocol Step
You can tag a user in the protocol step. The user will receive a notification regarding the same. To tag user, follow these steps:
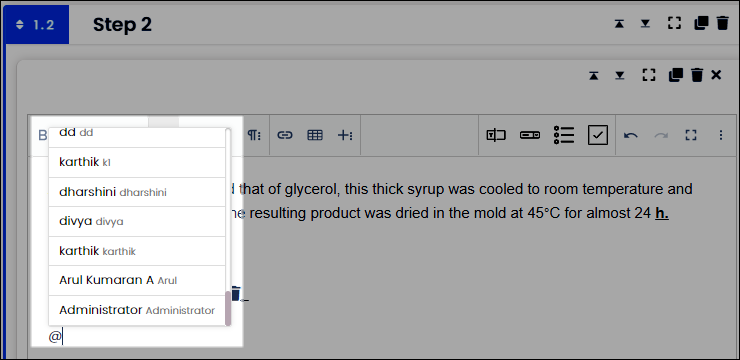
FIGURE: Tagging Users to the Protocol Step
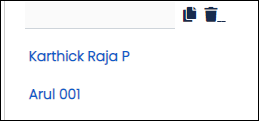
FIGURE: Tagged Users
And the tagged users will receive a notification regarding the same.
To link samples and projects to the protocol step, follow these steps:
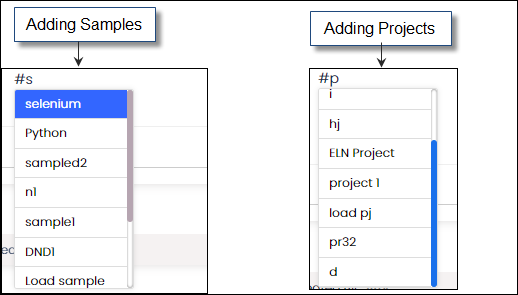
FIGURE: Linking Samples and Projects to the Protocol Step
Once you finish designing the step, you can do any of the following:
 to save the protocol.
 to add a section /step/editor above.
  to add a section /step/editor below.
  to view the section/step/editor in full screen.
  to copy/duplicate the section/step/editor. You can duplicate the section/step/editor and edit them as required.
  to delete the section/step/editor.
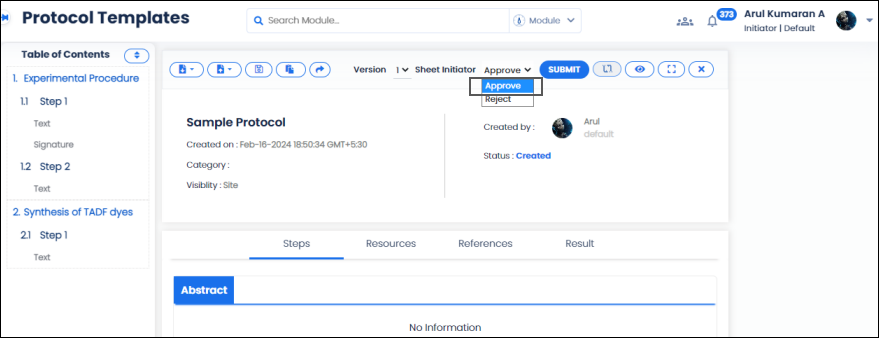
FIGURE: Approving Protocol
 and then click Export Json to export the protocol into Json format. You can also select sections in the protocol to export to Json. and then click Export PDF to export the protocol into PDF format. You can also select sections in the protocol to export to PDF format. The Export dialog appears as shown in the figure:
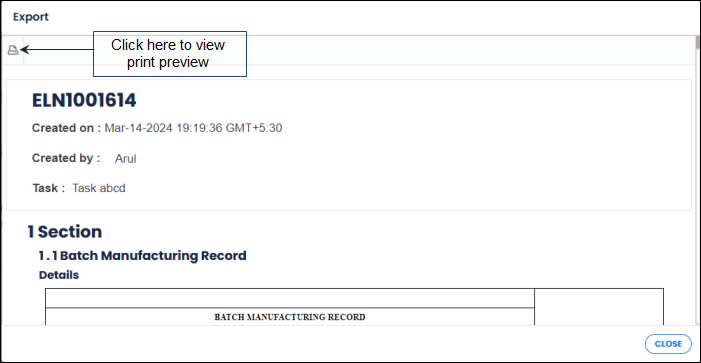
FIGURE: Export PDF Dialog
 to view print preview as shown in the figure:
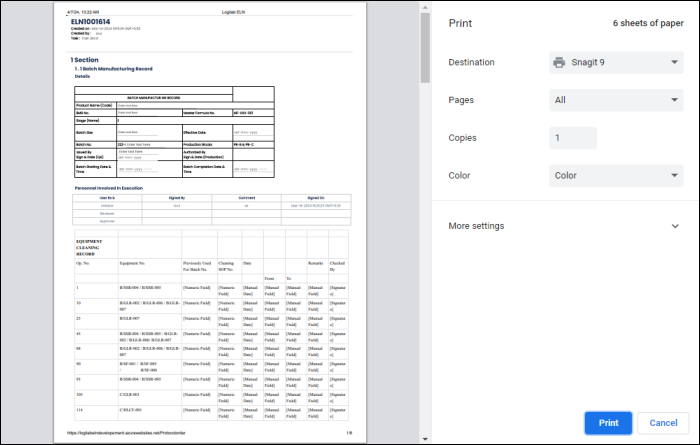
FIGURE: Print Preview Dialog
You can export selected sections in the protocol and export them to another protocol. To export sections to another protocol, follow these steps:
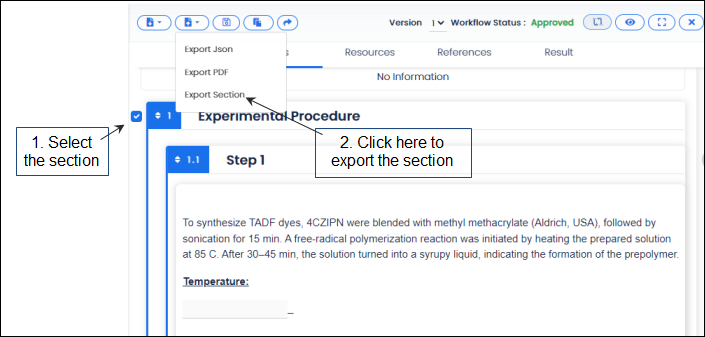
FIGURE: Exporting the Protocol Section
The Export Section dialog appears as shown in the figure:
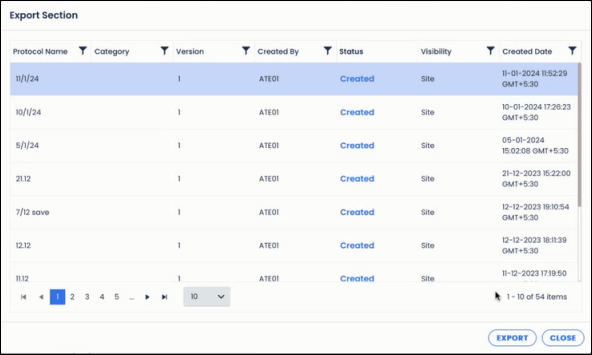
FIGURE: Export Section Dialog
The import Json option helps you to import a Json file to a protocol. You can import a Json file to create protocol. To do so, follow these steps:
and then click Import Jsonas shown in the figure:
FIGURE: Importing Json file
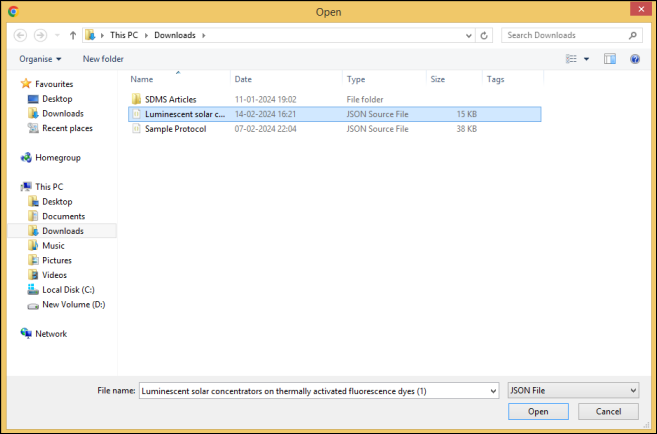
FIGURE: Importing the JSON File
You can see the Json file is imported and the imported sections and steps appears as shown in the figure:

FIGURE: Imported Sections and Steps
To import a section, follow these steps:
and then click Import Section as shown in the figure: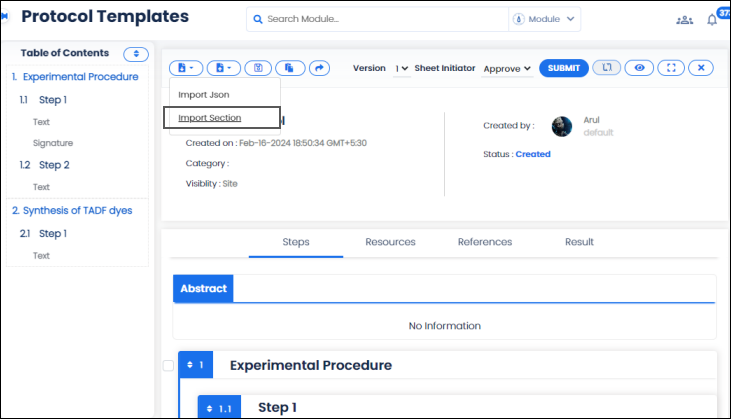
FIGURE: Importing Section
The Import Section dialog appears as shown in the figure:
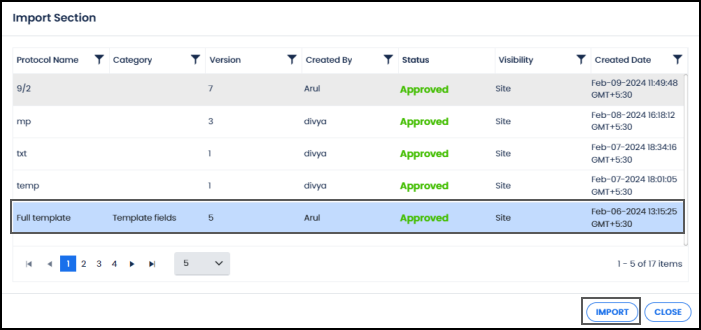
FIGURE: Import Section Dialog
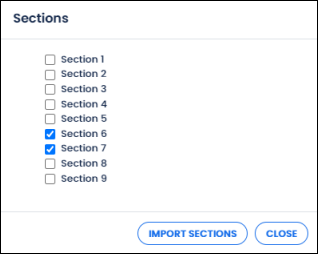
FIGURE: Sections Dialog
Select the sections to import and then click IMPORT SECTIONS. You can see the sections imported to the protocol as shown in the figure:
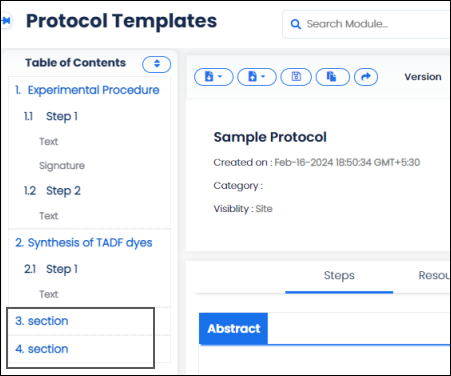
FIGURE: Sections Imported
You can edit and rearrange the sections in the protocol.
The Table of Contents panel that appears on the left side of the protocol screen lists the sections, steps, and editors in the protocol.
You can see the section name, list of steps in each section and list of editors in each step appears as shown in the figure:
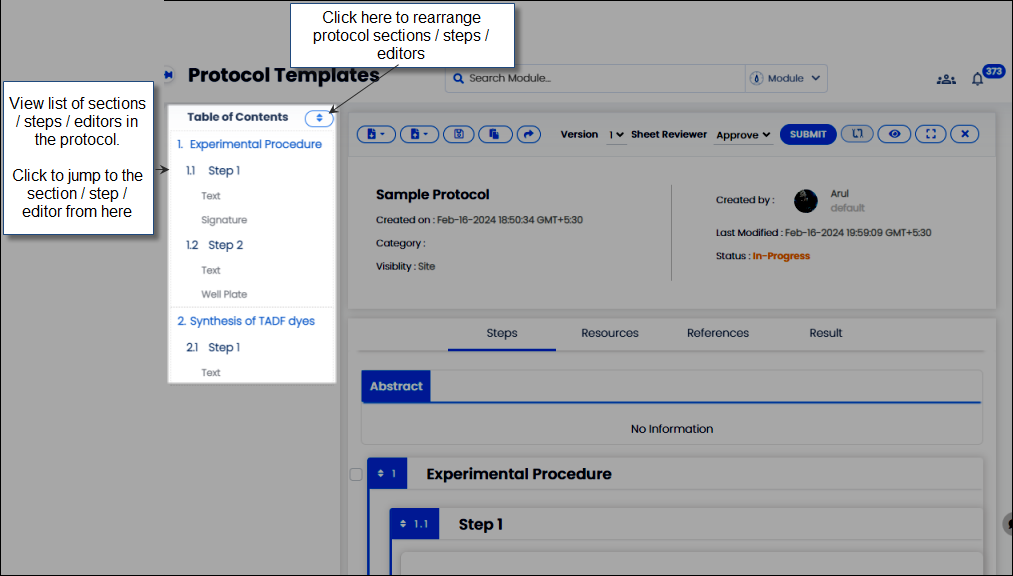
FIGURE: Navigating Through Protocol Sections / Steps / Editors
 go to the top / beginning of the protocol.
Logilab ELN enables you to add and reply to comments to the protocol steps. You can tag users in the comment. The users can reply to your comments.
To add comment to the protocol step, follow these steps:
 that appears near a as shown in the figure:
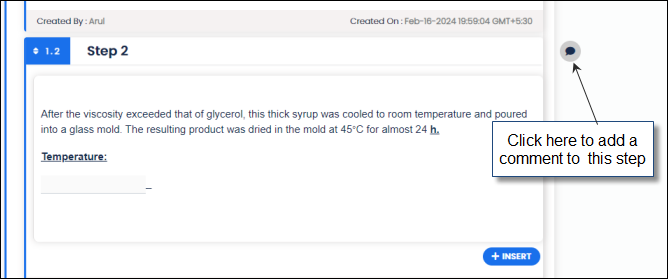
FIGURE: Adding Comment to Protocol Step

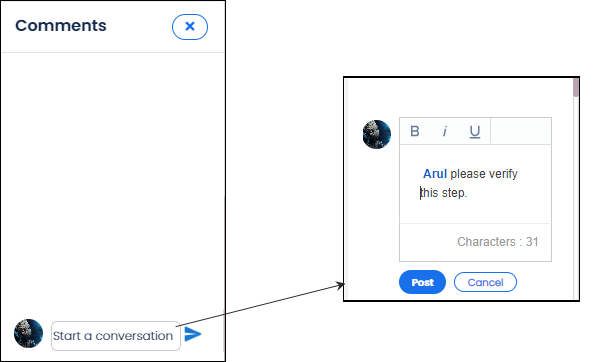
FIGURE: Comments Added and REPLY Option
Once created, you can rearrange the protocol sections, steps, and editors.
To rearrange, follow these steps:
 as shown in the figure:
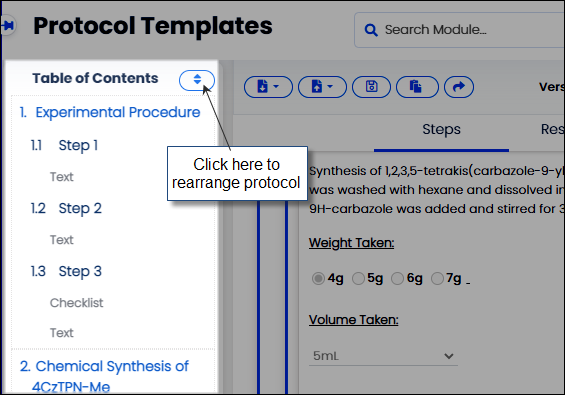
FIGURE: Table of Contents
The Rearrange dialog appears as shown in the figure:
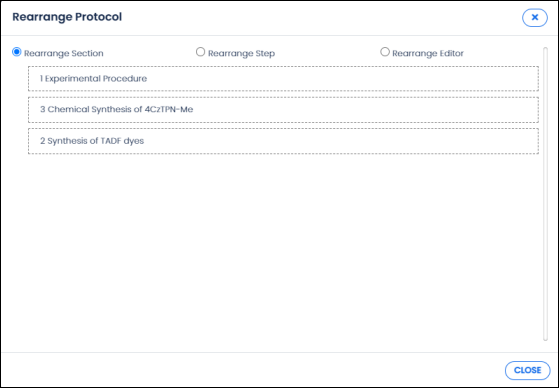
FIGURE: Rearranging Sections in a Protocol
By Default, the Rearrange Sections option is selected, and you can see the list of sections in the protocol.
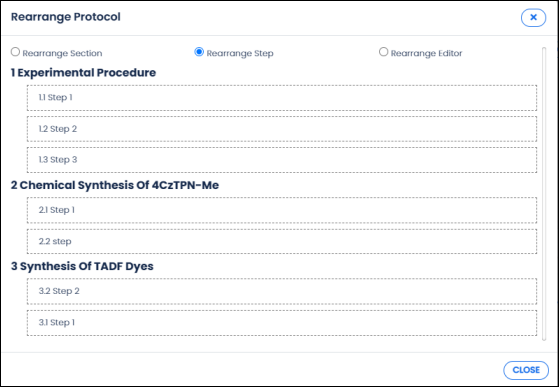
FIGURE: Rearrange Steps Within Sections
Note: You can rearrange the steps only within the section and you cannot move a step to another section.
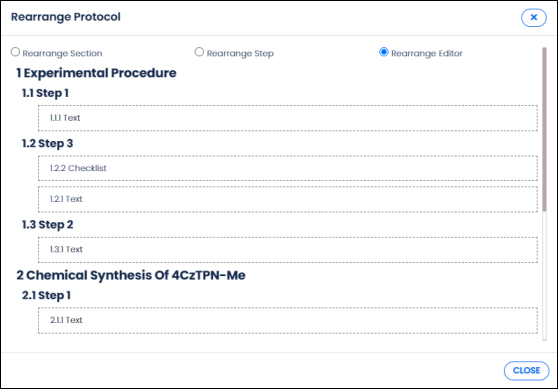
FIGURE: Rearrange Steps Within Sections
Note: You can rearrangethe editors only within the step and you cannot move an editor to another step.
You can edit template details that are in the Created status. Click Edit to edit template name, category and template visibility for templates in Created status. When you select a template in Created status, the EDIT option will be enabled as shown in the figure:
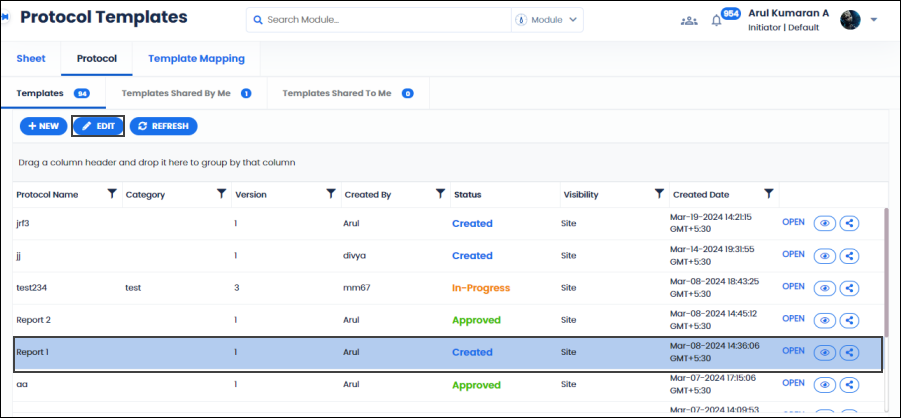
FIGURE: Editing Template Details
