Masters in Qualis DMS are used to store and maintain data outside a process and refer it in process using "Master" field type in the form. For example, when you store a sample, you may want to look up the storage data such as organisation, department, lab, site, section etc. In this example storage location data can be created and managed as a master. Also, user data can be created and managed as a master.
In Qualis DMS you can add/create masters, edit master details and delete existing masters.
Qualis DMS allows you to create and manage mail configuration.
The Mail Host screen helps you to add hosts to DMS. To do so, follow these steps:
1.On the Explorer, click MASTER Mail, and then click Mail Host. The Mail Host screen appears as shown in the figure:.
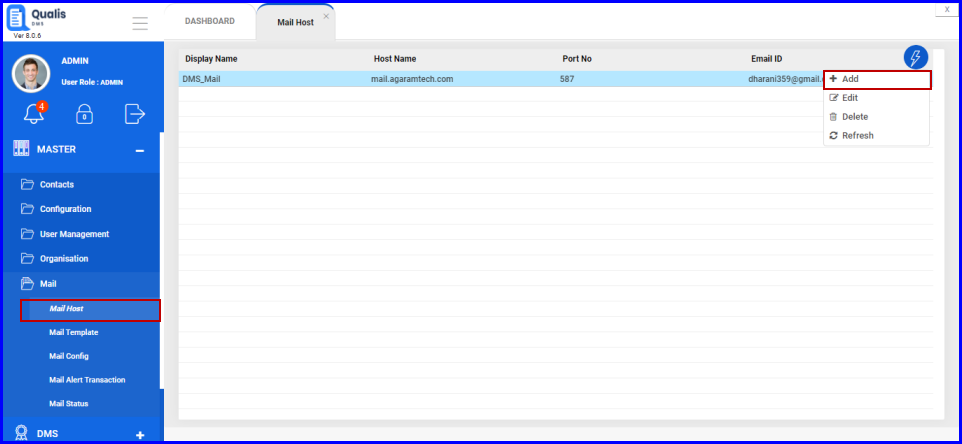
FIGURE: - Mail Host Screen
You can see the list of mail hosts added. Options to add, edit and delete hosts appear in the action menu
2.Click action menu and then click Add They Add Mail Host screen appears as shown in the figure:
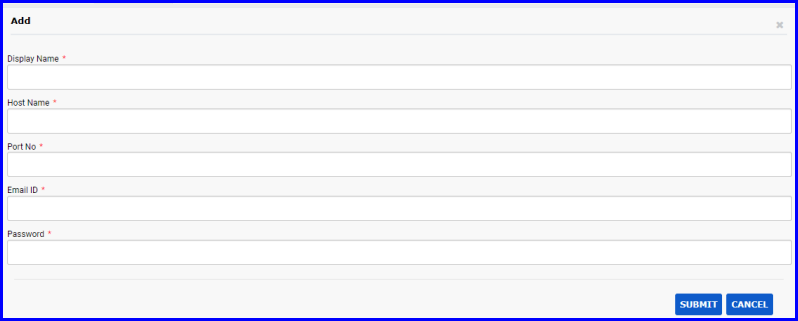
FIGURE: - Mail Host Screen
3.In the Display Name field, Type the display name for the host you want to add.
4.In the Host Name field, type host name.
5.In the Port No field, type the default port number for the host. The default port numbers are 587 and 456.
6.In the Email Id field, type the email id from which the mail will be triggered..
7.In the Password field, type the password for the email id mentioned..
8.Click SUBMIT.
You can see the mail host you just added listed in the mail host screen.
Mail Template is used to add and manage templates for the mails that are automatically triggered. Mail templates are used in the email configuration screen.
To create a new template, follow these steps:
1.On the Explorer, click Transaction, Mail and then click Mail Template. The Mail Template screen appears as shown in the figure:

FIGURE: - Email Template Screen
In the mail template master screen you can see the list of templates added. Options to add, edit and delete mail templates appear in the action menu.
2.Click action menu and then click Add. The AddTemplate screen appears as shown in the figure:.
2.To open an item in the Workspace, click an item in the Explorer
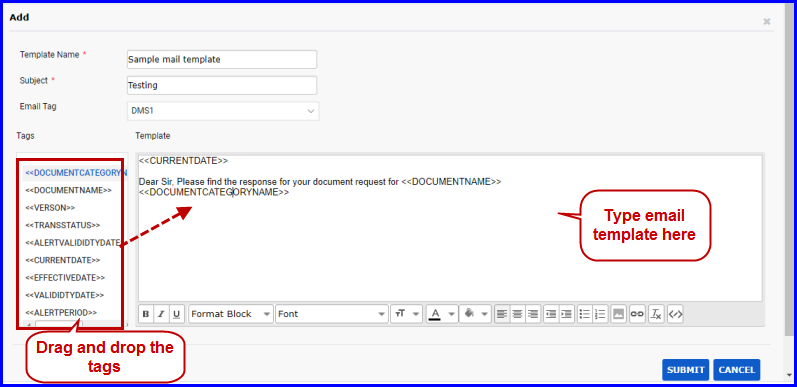
FIGURE: - Add Mail Template Screen
3.In the Template Name field, type a name for the template you add.
4.In the Subject field, type subject for the template.
5.In the Email Tag field, select a screen name. Tags associated with the selected screen appear in the side as shown in the above figure.
6.In the text field, type the mail content and add tags where ever applicable.
7.Click SUBMIT.
You can see the mail template you just added listed in the Mail Template master.
1.To edit email template details, in the mail template master screen, select the template, click action menu and then click Edit. In the Edit mail template screen, do required changes and then click Submit.
2.To delete a template, in the mail template master screen, select the template you want to delete, click action menu and then click Delete.
Mail Config is used to add and manage mail configurations. You can configure mails to trigger automatically when a selected action appears in the screen.
1.On the Explorer, click Transaction, Mail and then click Mail Config. The Mail Config screen appears as shown in the figure:
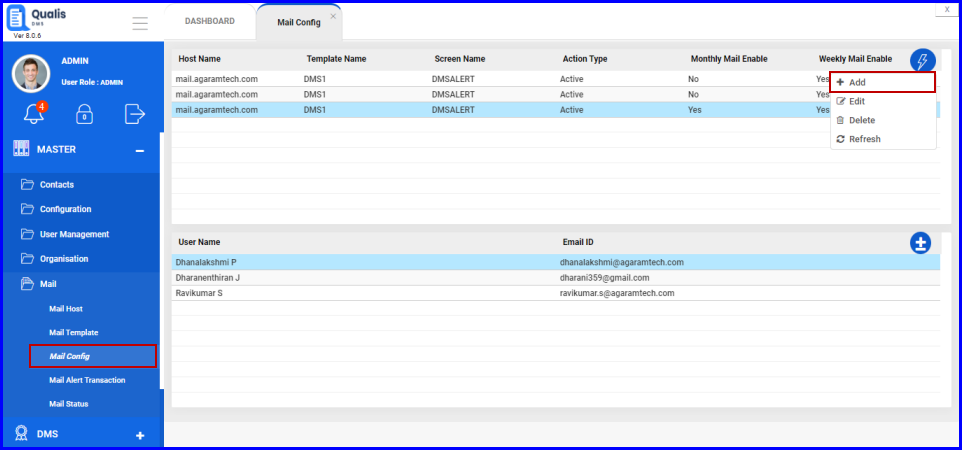
FIGURE: - Email Config Screen
In the mail config screen you can see the list of configurations added. Options to add, edit and delete mail configs appear in the action menu.
2.Click action menu and then click Add The Add Mail Config screen appears as shown in the figure:
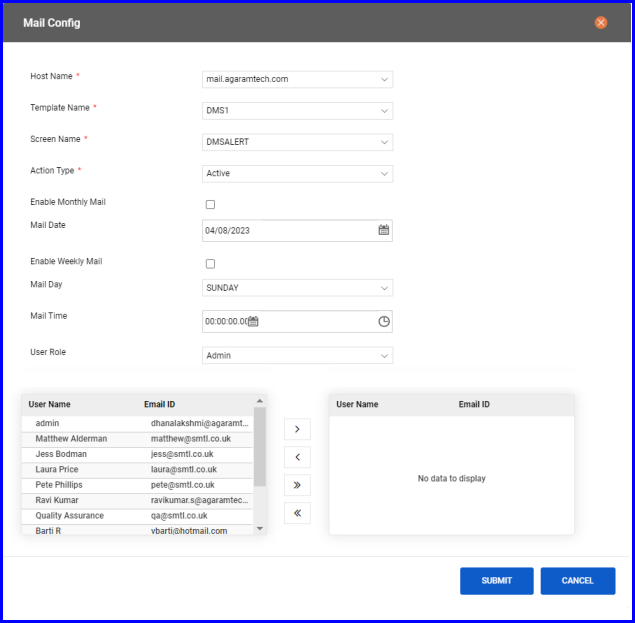
FIGURE: - Add Email Config Screen
3.In the Host Name field, select the host to send mail.
4.In the Template Name field, select a template for the email to configure
3.In the Host Name field, select the host to send mail.
5.In the Screen Name field, select the screen..
7.In the Action Type field, select an action when performed the mail has to be triggered..
7.In the Mail Time field, select the time the mail has to be sent. when you check this field, then when the selected action is performed in the selected screen a mail will be automatically sent to the concerned users in the selected role.
8.In the User Role field, select the role to receive mail. Users in the selected user role appears below.
9. select the users from the left side and click  to add them to the recipient list
10.Click SUBMIT.
You can see the mail config you just added listed in the Mail Config master
1.To edit email config details, in the mail config master screen, select the config, click action menu and then click Edit. In the Edit mail config screen, do required changes and then click SUBMIT. :
2.To delete a configuration, in the mail config master screen, select the config you want to delete, click action menu and then click Delete.
1.On the Explorer, click Transaction, Mail and then click Mail Alert Transaction. The Mail Alert Transaction screen appears as shown in the figure:
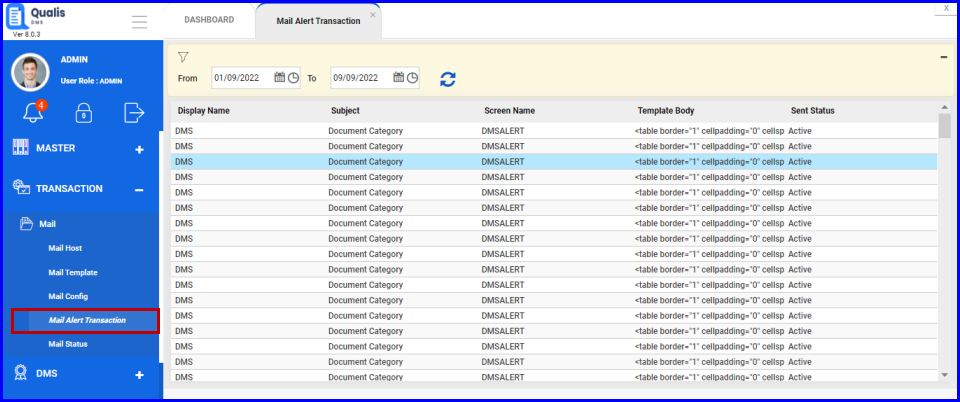
FIGURE: - Email Status Screen
Details like email subject, the recipient, sent status and date of email sent will appear as shown in the above figure.
