Sample Registration screen is where you add and register sample details. Once you pre-register samples, you can register, add tests and attach files to the samples and then accept the sample to register it. If required, you can cancel the sample registration or quarantine the sample for some reason.
Following is the list of color codes for the sample records in each status:
To register a sample, follow these steps:
1.On the main menu, click ![]() Registration and then click Sample Registration. The Sample Registration screen appears as shown in the figure:
Registration and then click Sample Registration. The Sample Registration screen appears as shown in the figure:
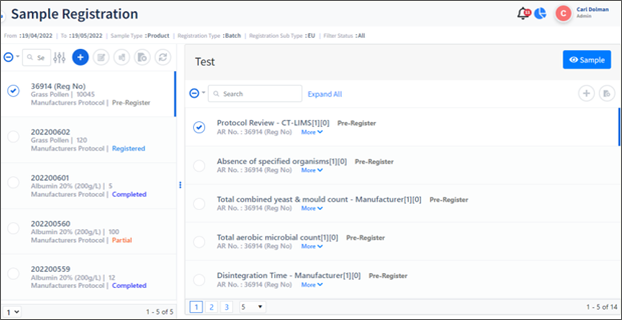
FIGURE: Sample Registration Screen
Click  in the Filter dialog, select From and To date, Sample Type: Product, Registration Type: Batch / Non Batch / Plasma Pool, Registration Sub Type and Filter Status. And then click SUBMIT as shown in the figure:
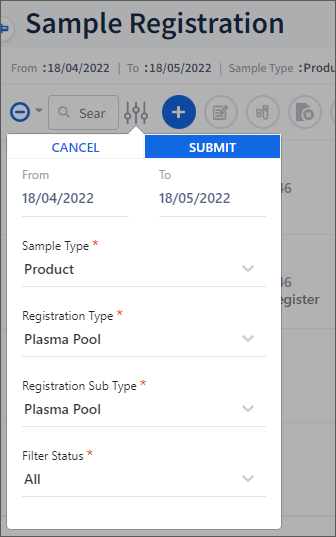
FIGURE: Using Filter in Registration Screen
List of samples registered for the selected criteria appears. You can register sample for the selected Registration Type and Registration Sub Type.
2.Click  to register a sample. The screen appears as shown in the figure:
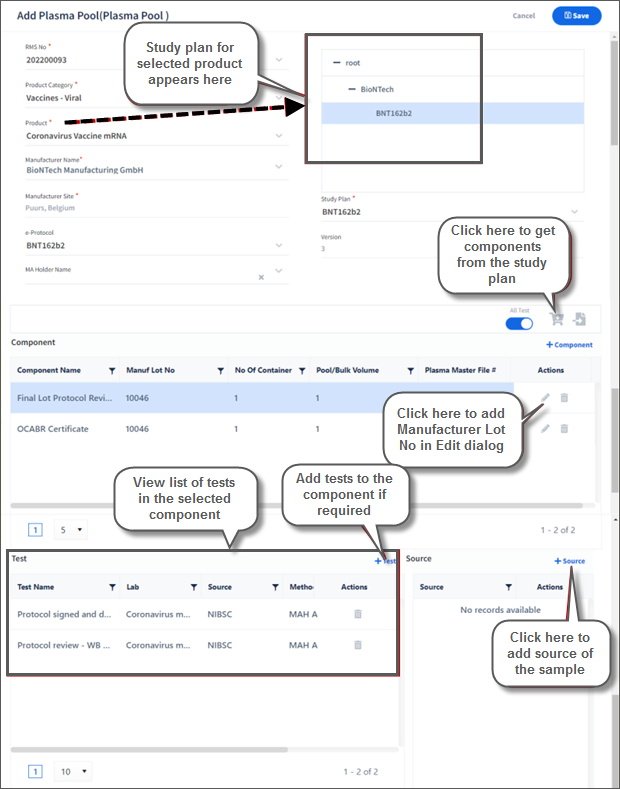
FIGURE: Registration Add Screen
3.In the RMS No field, select the RMS number for which the sample is registered.
Note: RMS number is generated in the Goods In screen.
4.In the Product Category field, select the product category.
5.In the Product field, select the product to register. Based on the selected product, the study plan created in the Study Plan screen for the selected product along with the Study Plan name will appear on the right side as shown in the above figure.
In the Manufacturer Name field, select the product manufacturer. Based on the selected manufacturer, the Manufacturer Site appears
In the e-Protocol field, select e-Protocol for the sample
8.Click  to get components from the study plan. All components from the study plan will appear under Components as shown in the above figure.
9.The All Test option will be turned on by default and all the tests in the component will be available for registration. If required, you can turn off this option and remove tests from the selected component.
10.Note: Manuf Lot No. field in the component record is mandatory. Hence, click  to edit the component. The Edit Component dialog appears as shown in the figure:
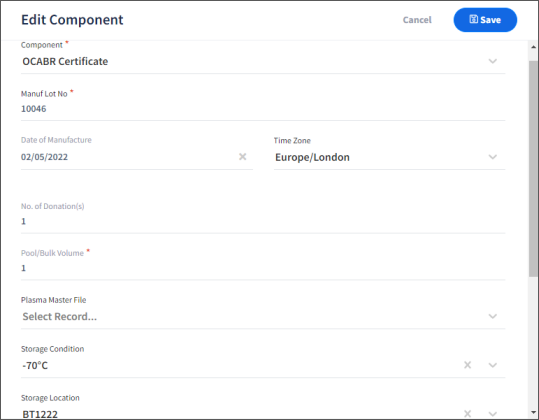
FIGURE: Edit Component Dialog
11.In the Manuf Lot No. field, type the lot number.
12.In the Storage Condition field, select storage condition for the selected product.
13.In the Storage Location field, select storage location for the selected product.
13.In the Storage Location field, select storage location for the selected product.
14.Click Save. Same way, you can add Manuf Lot No. to other components.
15.Under Tests, you can see list of tests in the selected component. If required, you can delete tests from the list or add tests to the list. Click  to add more tests to the component..
16.Click  and add source of sample.
17.Click Save. The sample is registered for each component in the registration screen, you can see samples registered as shown in the figure:
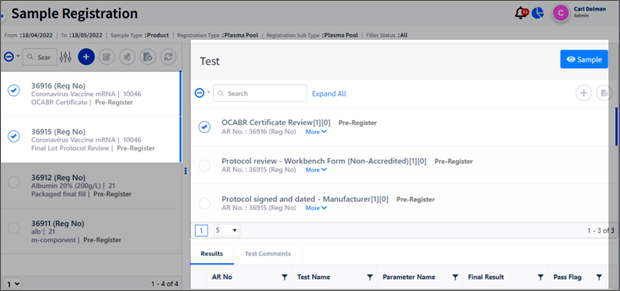
FIGURE: Registered Sample
You can see the samples registered. In this example, there are two components, hence two records are generated for the sample as shown in the above figure.
The samples appear in Pre-Register state. In this state, you can accept the sample to register the sample. Or you can cancel / reject the sample.
Mouse over a record. You can see options to edit the record details, print barcode and add source options as shown in the figure:
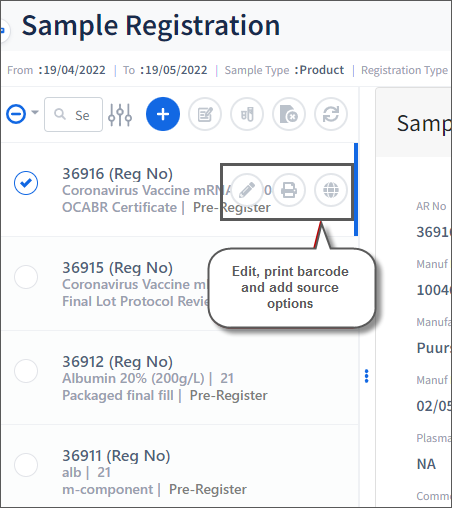
FIGURE: Registered Sample Showing Edit, Print Barcode and Add Source Options
Select a record; you can see the tests added for the sample listed on the right side as shown in the figure:
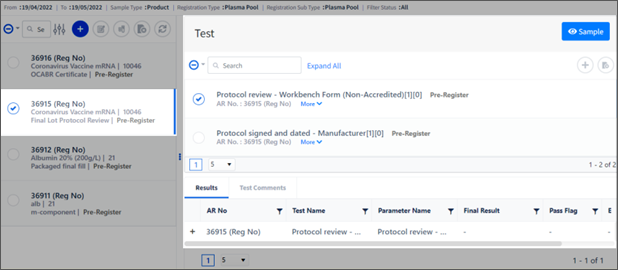
FIGURE: Viewing Tests Added to the Sample
Click  to add more test(s) to the selected sample registered.
Select a test and then click  to cancel / Reject test.
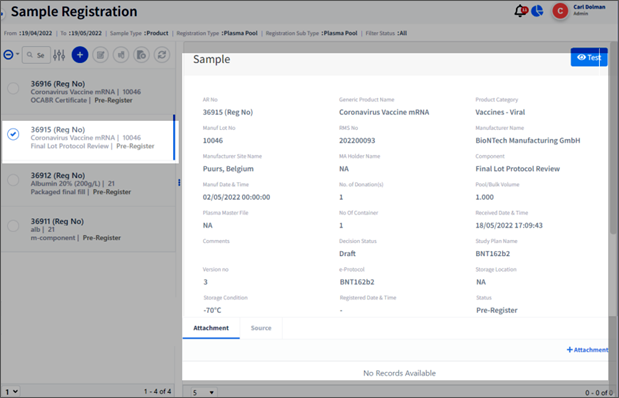
Click  to view sample details. The sample details appear as shown in the figure:
Click  to add attachments to the sample.
In the Pre-Register state, you can accept the sample.
1.In the Sample Registration screen, select a sample that is in the Pre Register state and then clic  kto accept the sample as shown in the figure:
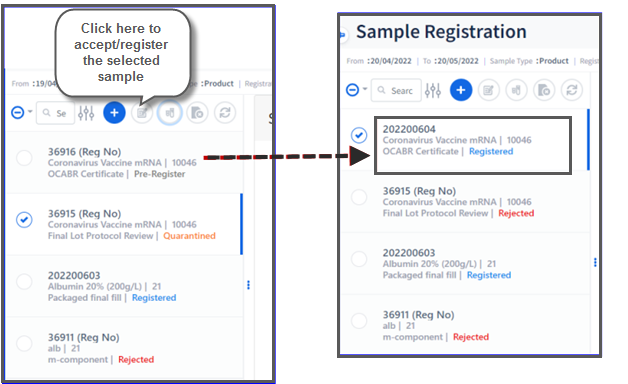
FIGURE: Accepting Sample
2.In the Confirmation dialog, click Ok.
The accepted sample appears as Registered and the AR No is generated as shown in the above figure.
You can cancel/reject the sample before or after registration.
1.To cancel/reject the sample, in the Sample Registration screen, select the sample and then click as shown in the figure:
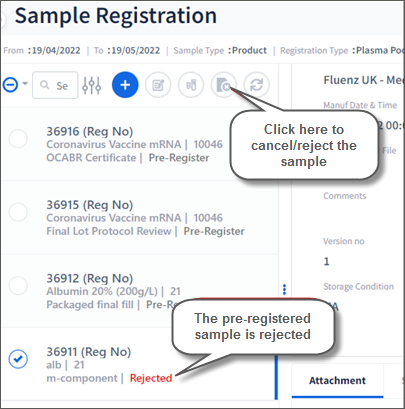
FIGURE: Cancel / Reject Sample
1.If you cancel/reject sample in the preregister stage then the sample is rejected.
2.If you cancel/reject sample in the registered stage then the sample is cancelled
You can quarantine the sample that is in the Pre-register state.
1.To quarantine the sample, in the Sample Registration screen, select the sample and then click  as shown in the figure:
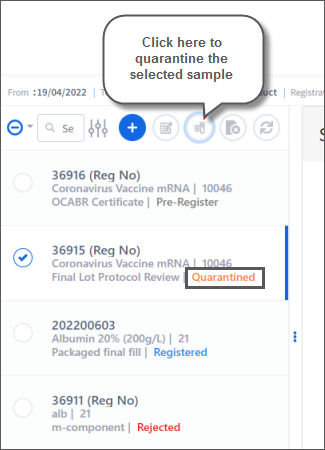
FIGURE: Quarantine Sample
The status of the sample appears as Quarantined. You can accept a quarantined sample to register it or cancel/reject it.
