To configure Preferences, follow these steps
1.On the main menu, click  , and then click Preference. The screen appears as shown in the figure:
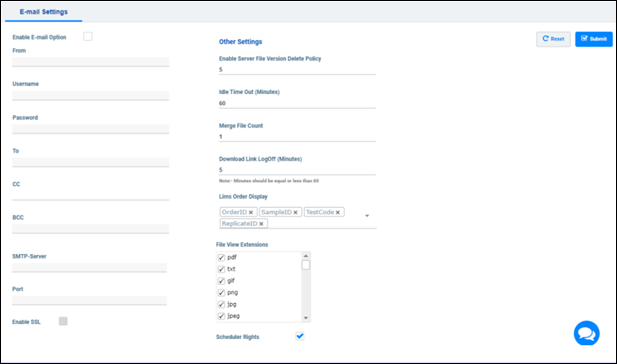
FIGURE: Preferences Screen
2.In the File View Extension field, click to check the file extensions from the list. The system supports viewing, uploading and downloading of files that are enabled here
3.Fill in all other fields and then click Submit to save the settings.
4.Click Reset to clear all fields for fresh entry if required..
The administrator can use the Preference screen to setup the following:
Email alerts are emails generated by an automated process and sent to designated recipients. These actions consist of the standard text and list of recipient
In the Preference screen, if Enable Email Option is checked, then email alerts are sent for the following scenarios in the server:
Type the email id and password from which the mail alert has to be sent. Add recipient mail ids in the To box and CC and Bcc boxes and other fields as applicable.
Every time a user updates, restores or uploads a new version of an existing file, a new version of the file is created as well as a history of actions for each file
To avoid a storage issue, you can define the number of latest versions of the file before permanently deleting the older versions automatically.
In the Enable Server File Version Delete Policy field, if you type 5, then latest 5 versions of the files are retained and all older versions are deleted automatically.
When this setting is configured, application logs out automatically after a specified period of inactivity. The default value for idle time-out is 60 minutes.
When files are generated by instruments in SDMS, after the specified number of files in Merge File Count field is collected, the files are uploaded to the server / given location. For example, if theMerge File Count is 5, then after five files are collected, the same is uploaded to the server.
Note: In the Merge File Count field, you can type a number up to five digits.
The link shared in the Server Data - File Information tab to view the file for other users, will expire in number of minutes specified in the Download Link Logoff (Minutes) field. For example, if Download Link Logoff (Minutes) is 5, then the shared link expires in five minutes.
OrderID and BatchID should appear here. Only then on integration of ELN and LIMS with SDMS you can select and process orders in the Instrument Lock and Tag screen as shown in the figure:

FIGURE: LIMS Order Display Option
When this option enabled, user can define access rights for the scheduler tasks in the User Management-Scheduler Rights tab.
1.On the main menu, click, and then click License Information. The screen appears as shown in the figure:
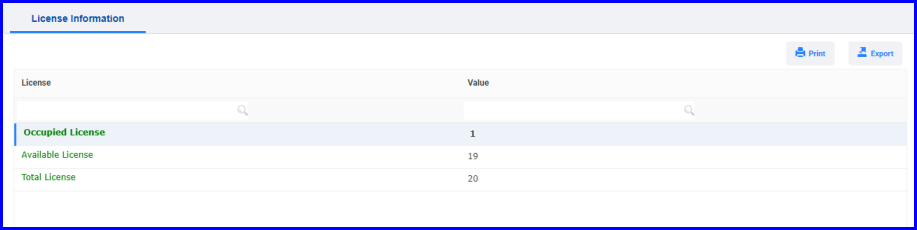
FIGURE:- License Information Screen
Occupied License denotes number of instruments used or added
Available License denotes number of instruments shall be added
Click Print to preview and print license information
Click Export to export license information to Excel.
Workflows can be designed based on logic in each stage. For example, the data captured from an instrument shall pass through the following stages in a workflow:
| Workflow Stage | Role Mapped | Workflow Status |
|---|---|---|
| Assign | Analyst | Reviewed |
| Analyze | Data Analyst | TAnalysis Completed |
| Verify | QC | Verified |
| Approve | QC Manager | Approved |
Each stage in the workflow is mapped to a role. Once the data pass through a stage, the status of the data/file is changed to the next status. The data/file should pass through all the stages in the workflow to successfully complete the job.
You can design work flow by adding user groups to each work flow stage.
1.On the main menu click, and then click Workflow Setup. The screen appears as shown in the figure:
FIGURE:- Work Flow Setup Screen
You can see the list of existing work flow steps on the left panel.
To create a new work flow, follow these steps:
2.In the Work Flow Step box, the current Workflow Step name selected is displayed.
3.Under User Group Name box, click to select the user group for the selected work flow step.
4.Set Workflow for each step by selecting respective User Group Name.
5.Click Save.
Audit Trail Configuration screen helps you to configure audit trail. Also enables you to filter records based on specified duration, user and module name, export records to excel file, print records, create archive and open archive to view.
To view audit trail log, follow these steps:
1.On the main menu, click and then click Audit Trail Configuration. The Audit Trail Configuration screen appears as shown in the figure:
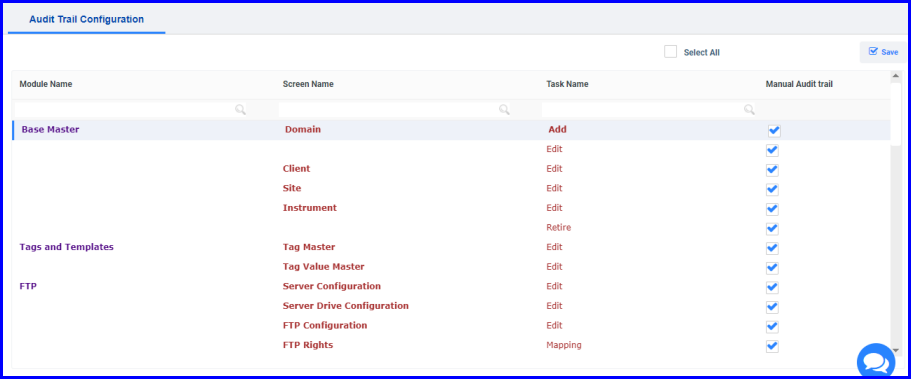
FIGURE: 109 - Audit Trail Configuration Screen
You can configure audit trail for tasks in the selected screen. To do so, follow these steps
2.In the Audit Trail Configuration screen, you can see list of Module Name, Screen Name and then the Tasks in the screen
3.To configure audit trail for a task, click to select respective check under Manual Audit Trial and then click Save. The E-Signature window will prompt for user name and password while completing that particular task.
4.Same way, you can configure audit trail for tasks in the other screens.
When SDMS is connected to SQL server, the SQL Database Log Maintenance screen enables you to clear the SQL log.
To clear SQL log manually, follow these steps:
1.On the main menu, click and then click Maintenance. The SQL Database Log Maintenance screen appears as shown in the figure:
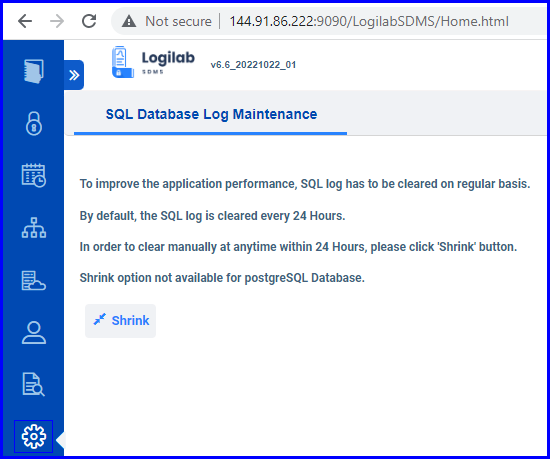
FIGURE:- SQL Database Log Maintenance Screen
2.Click Shrink. Wait un till the log is cleared.
3.You will see a message as shown in the figure:
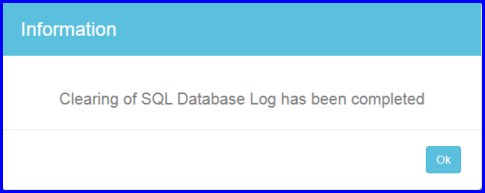
FIGURE:- SQL Log Cleared -Message
