Logilab SDMS uploads files captured from the instruments using FTP. The FTP Configuration menu enables you to create server/disk space and configure the same for file upload. This process consists of the following three steps:
Server Configuration
Drive Configuration
FTP Configuration
Here you set the server machine for file upload. You need to select the server name and the OS and then provide valid username and password for the server machine access. You can create an active or passive server. However, you can update the status of the server later.
1. On the main menu click, On the main menu click, and then click FTP Configuration. By default, the Server Configuration tab appears as shown in the figure:
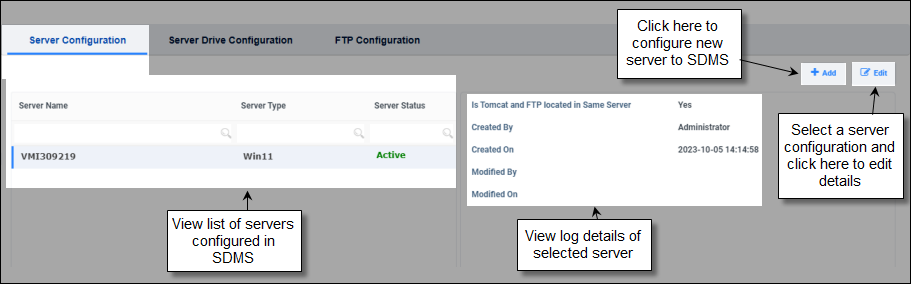
FIGURE: FTP Configuration – Server Configuration Tab
To add a Server Configuration, follow these steps:
2. In the Server Configuration tab, click. The Add Server Configuration dialog appears as shown in the figure:
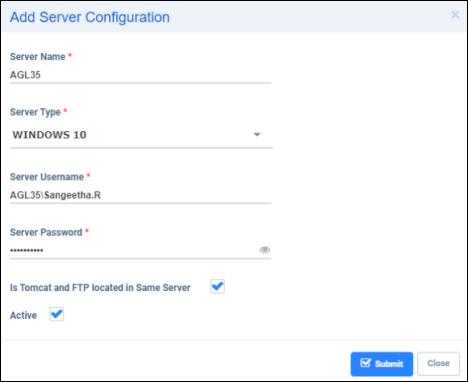
FIGURE: Add Server Configuration Tab
3. In the Server Name field, Type the PC name that you want to use as server.
Note: If in a network, list of computer names that are connected to the network appears here. In that case, you can select the computer from the list.
4.From the Server Type field, select the OS name of the server. The server machine may have been installed with dual OS. So you need to mention the OS for the selected server.
5. In the Server Username field, type the user name for the server.
6. In the Server Password field, type the password.
Note: You need to provide valid user name and password that you use to login to the server machine. The same user credentials are validated in the IIS while setting up FTP. Click here to see more information on IIS and Setting up FTP.
7. Click to select Is Tomcat and FTP located in Same Server check box if the Tomcat and FTP servers are configured in the same machine.
8. Click to select the Active check box to make this server active.
9. Click Submit to save the server configuration.
Warning! : If you click Close before saving will close the FTP Configuration screen without saving the configuration.
1.In the Server Configuration tab, select the configuration you wish to update and then click.  The Edit Server Configuration dialog appears. Update the configuration details and then click Submit to save the changes.
Note: You cannot edit Server Name.:
Here you select the drive where you can create folders/directories for file upload. Select the server and then select the drive path in the selected server
1.In the FTP Configuration screen, click Server Drive Configuration tab. The Server Drive Configuration tab appears as shown in the figure:
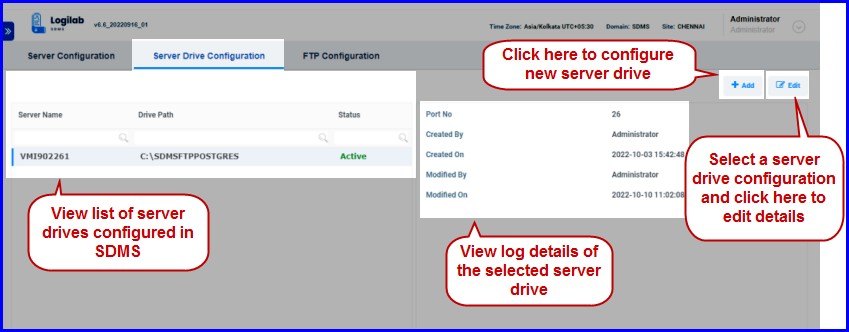
FIGURE: Server Drive Configuration Tab
To add a Server Configuration, follow these steps:
1. In the Server Configuration tab, click. The Add Server Configuration dialog appears as shown in the figure:
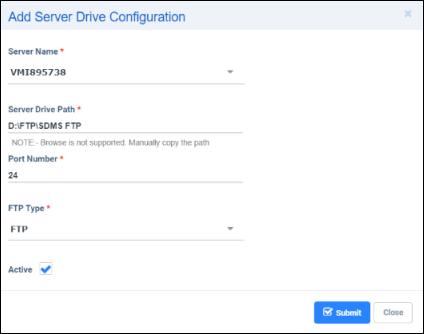
FIGURE: Add Server Configuration Tab
2.From the Server Name field, select the server name you want to create the disk /drive space.
Note: Servers that you added in the Server Configuration tab will appear in the Server Name field. Select a server from the list.
3. In the Server DrivePath type the path of the site that you created in IIS. For example if you have created C:\SDMSFTP Site in IIS, then type the same path here. Or copy and paste the path manually.
4. In the Port Number field, type the port number for the drive selected.
5.In the FTP Type field, select FTP / FTPS / SFTP.
FTPS: is known as FTP SSL which refers to File Transfer Protocol (FTP) over Secure Sockets Layer (SSL) which is more secure from FTP. FTPS also called as File Transfer Protocol Secure. It refers to basic FTP with security which protects data from any attack by encrypting it so that no one can be able to make use of any information in between transmission at both the ends.
SFTP is known as SSH FTP which refers to File Transfer Protocol (FTP) over Secure Shell (SSH) which encrypts both commands and data while in transmission. SFTP also called as Secure File Transfer Protocol. It works as an extension to SSH. It encrypts files and data then sends them over a secure shell data stream. This protocol allows to remotely connect to other systems and executing commands from the command line.
6. Click to select the Active check box to make this drive configuration active..
7.Click Submit.
In the Server Drive Configuration tab, select the drive configuration you wish to
update and then click . The Edit Server Drive Configuration dialog appears. Update the drive configuration details and then click Save to save the changes.
Note: You cannot edit Server Name.:
FTP configuration is where you create directories / folders for file upload. The client machines are grouped based on the departments/ sections etc and for each group you can create a directory. For example creating a group R&D enables store files related to the RnD department/group.
Select the server and drive and then specify the directory name in the FTP Alias Name and FTP Virtual Directory Name. FTP Alias Name and FTP Virtual Directory Name can be same for the ease of identification.
1.On the FTP Configuration screen, click FTP Configuration tab. The FTP Configuration tab appears as shown in the figure:
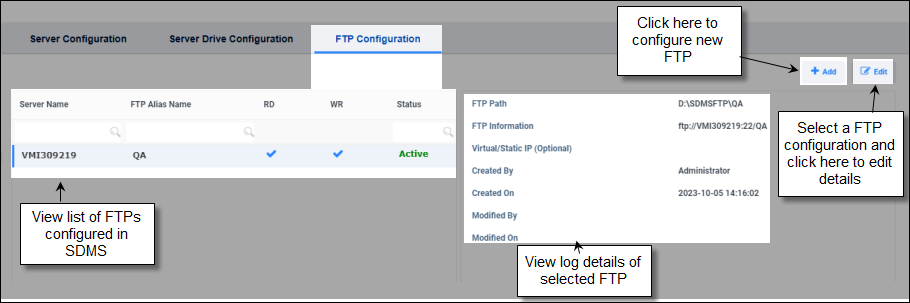
FIGURE: 45 - FTP Configuration Tab
To add FTP Configuration, follow these steps:
1.In the FTP Configuration tab, click. The Add FTP Configuration dialog appears as shown in the figure:
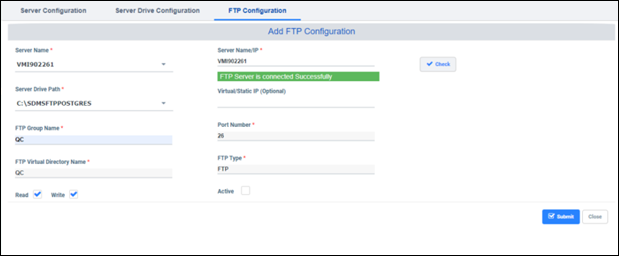
FIGURE: Add FTP Configuration Tab
2.From the Server Name field, select the server name you want to create the directory.
3.In the Server DrivePath field select the drive where you want to create the directory. For example if you have created C:\SDMSFTP Site in IIS, then select the same path here..
4.In the FTP Group Name field, type a name for the group you want to create and then click Check.You can see a message " FTP Server is Connected Successfully" in green.
5.By default, the Read and Write options are enabled. If you want, you can disable any of these options as required..
6.In the Server Name / IP field, the name or IP address of the server machine appears.
7.In the Virtual/Static IP (Optional) field, type IP address of the server.
8.In the Port Number field, type the port number that you allotted in the IIS while creating the FTP site for the drive selected.
9.Click to select the Active check box to make this drive configuration active. However, you can change the status later.
10.Click Check. This checks if the FTP path mentioned is accessible and verifies if the read and write permission for the given path is valid.
11.Click Submit. The FTP is added and appears as shown in the figure:
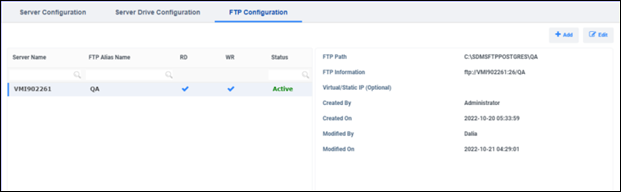
FIGURE: Added FTP
In the FTP Configuration tab, select the FTP configuration you want to update and then click The Edit FTP Configuration dialog appears. Update the configuration details and then click Save to save the changes.
You can define access rights to the user groups to view FTP directories. To do so, follow these steps:
12.On the main menu click, and then click FTP Rights. The FTP User Mapping View screen appears as shown in the figure::
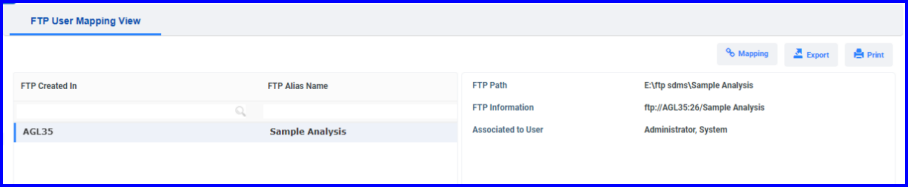
FIGURE: 48 - FTP User Mapping View Screen
13.You can see list of FTP locations available.
14.Select an FTP location from the list to map users and then click  . The FTP User Mapping Entry screen appears as shown in the figure:

FIGURE:- FTP User Mapping Entry Screen
15.In the FTP Name box, the selected FTP directory appears.
16.In the Group Name box, select the user group you want to map to the FTP directory.
17.Now you can see the selected user group under User Map. Click the check box under Map to select individual user to map. To map all the users in the selected user group, click to select the Select All check box..
18.Click Submit. Users selected from the user group are mapped to the selected FTP directory.
In the FTP User Mapping View screen, click Export to export FTP locations to Excel
Click Print to print FTP location details
