Masters menu helps the administrators to add and manage domains, clients, instruments, sites, templates and tags.
e basic masters in Logilab SDMS:
You can add and edit, export and print master entries in the respective master tabs
Templates are created and managed to capture files in a customized structured manner in SDMS. When files are uploaded the pre tagged, templates enables automatically group, store and retrieve files easily. In templates you structure data by creating tags and group them in hierarchy.
Template Tags enable association of meta data to records captured which in turn used to search related records.
To setup templates, follow these steps:
1.On the main menu click,  and then click Template and Tags. The screen appears as shown in the figure:
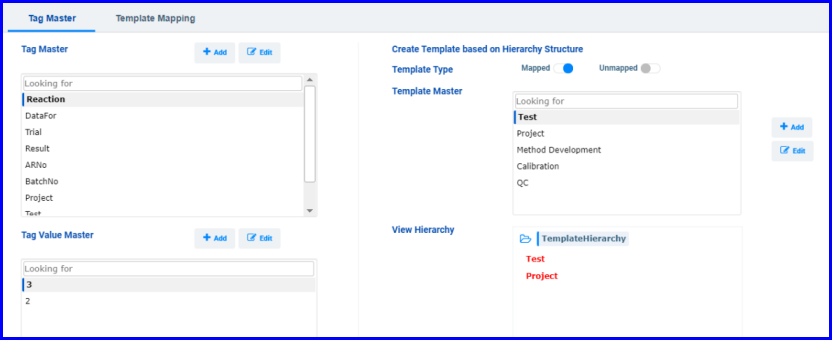
FIGURE:Template and Tags Screen
Creating a template consists of the following steps
Tags are basic components of a structure and define meaning of any data. Therefore, you create a tag and add values to the tags. For example: Test is a tag and all the test types are added as tag values to the test as shown in the figure:
To create a tag, follow these steps:
1.In the Tag Master tab, under Tag Master, click.  In the Tag Name field, type the tag name and then click Submit. As shown in the figure:

FIGURE: Tag Master Tab
Note: If the tag is assigned with Values then it becomes Master Tag and allows selection of predefined values as dropdown. If the Tag is not set with values then it behaves as User Input tag and user can input the values during transaction.
2.Once you add tags, you need to add tag values to the same. In the Tag Master, select the tag you want to add values and then under Tag Value Master, click  . The Add Tag Value dialog appears as shown in the figure:
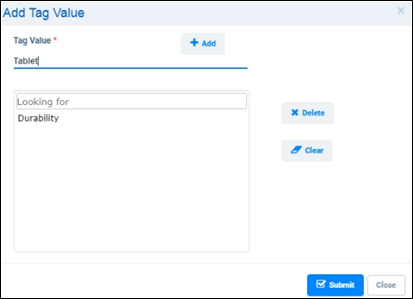
FIGURE: Add Tag Value
3.In the Tag value field, type the tag value and then click Submit. Same way, you can add multiple values to a tag. All the values appear as dropdown list in the transaction.
Note: Only Tags with tag values appear in the Hierarchy Structure and Template Master screen.
For Mapped templates you can define the hierarchy in the Hierarchy tab and add values in the Template Master tab. Tags added in the hierarchy will become mandatory tags in the template. One-to-many relations can be defined to the Master Tags by defining Mapped Tag structure.
For Unmapped templates, you cannot define the hierarchy. But you can add tags in the Template Tags tab. These tags are not mandatory tags and become additional/optional tags in the template. Unmapped tags display full list independently for selection, unlike mapped tags with one-to-many relation. To more details about templates, refer Creating Templates.
1.To edit a tag name, under Tag Master, select the tag name to edit and then click Edit as shown in the figure:
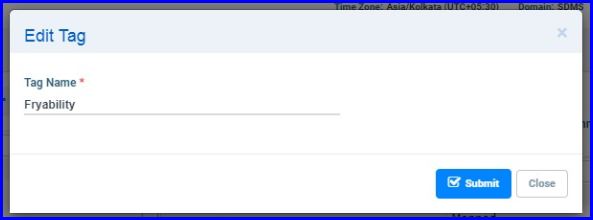
FIGURE:- Editing Tag Name
2.The tag selected for edit appears in the Edit Tag dialog. Do required changes and then click Submit as shown in the above figure.
1.To edit tag value, under Tag Value Master, select a tag value and then click Edit. The Edit Tag Value dialog appears as shown in the figure:
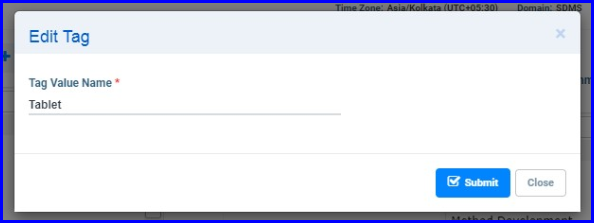
FIGURE: Editing Tag Value
2.The tag value selected for edit appears in the Edit Tag Value dialog as shown in the above figure.e.
Edit the tag value and then click Submit.
1.In the Template and Tags screen, The Template Master section appears as shown in the figure:
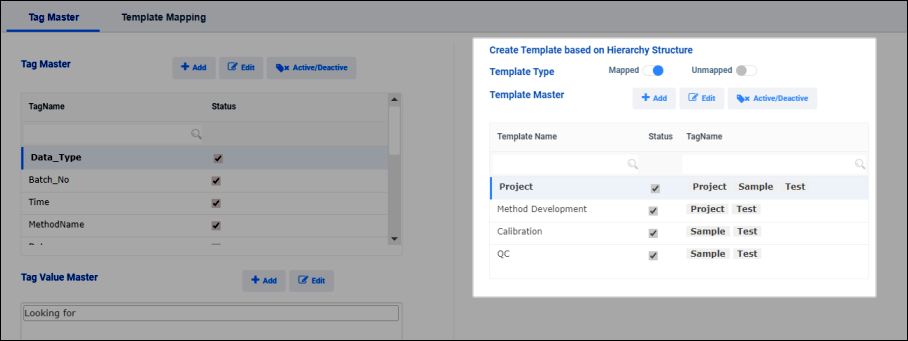
FIGURE: Template Master Section
Here you create a structure using tags in hierarchical order. For example, Sample is the first level and Test is the second level in the hierarchy. Before you create a structure you must specify the type of the template: Mapped/Unmapped.
To create a template, follow these steps:
2.Define the template type by selecting Mapped / Unmapped.
3.In the Template Name field,Template Name field, type a name for the template and then click. The Add Template dialog appears as shown in the figure:
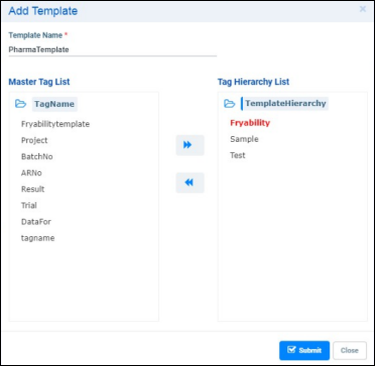
FIGURE: Add Template
4.Do any one of the following:
5.Click Save.
Note: The templates you created here are listed in the Template Name field in the Template Mapping tab with Fields in defined hierarchy to assign one- to- many relational values.
Once you create a template, you can set values to the tags in the template. To do so, follow these steps:
1.In the Template and Tags screen, go to the Template Mapping tab. The tab appears as shown in the figure:
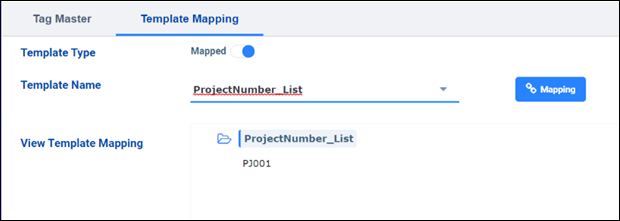
FIGURE: Template Mapping Tab
2.In the Template Mapping tab, In the Template Name field, select the template. Templates that you created in the Tag Master tab are listed here.
3.Click.  The Configure dialog appears as shown in the figure:
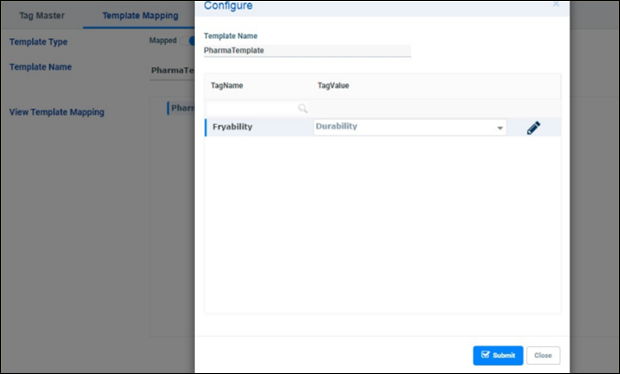
FIGURE: Template Mapping Tab – Configure Dialog
4.List of tags added to the template appears on the left side. Values added to the tags appear instead of the tag names.
5.Under TagValue, select the value for the tag. List of tag values appears for the selected tag.
6.Click Save.
7.Same way you can add more values for the selected tag in the template. After you add values to the tags in the hierarchy in the Template Master tab, you can see the tree view of the tags and tag values as shown in the figure:
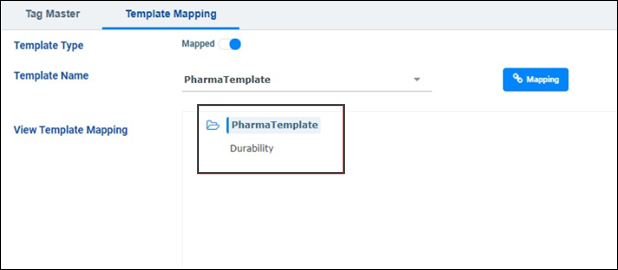
FIGURE: Tree view of Tags and Tag Values in the Template Mapping Screen
Unmapped templates do not have mandatory tags; hence, you cannot see tags. Additional tags added in the Template Tags tab appears in the Instrument Lock screen.
