Masters menu helps the administrators to add and manage domains, clients, instruments, sites, templates and tags. Following are the basic masters in Logilab SDMS:
You can add and edit, export and print master entries in the respective master tabs
The Instrument master tab enables you to do the following:
1.On the main menu, click,  and then click Base Masters. The Base Masters screen appears. Click Instrument to go to the Instrument master tab. The Instrument master tab appears as shown in the figure:

FIGURE: Instrument Master Tab
To add an instrument to the Instrument master, follow these steps:
2.On the Instrument master screen, click. The add instrument screen appears as shown in the figure:
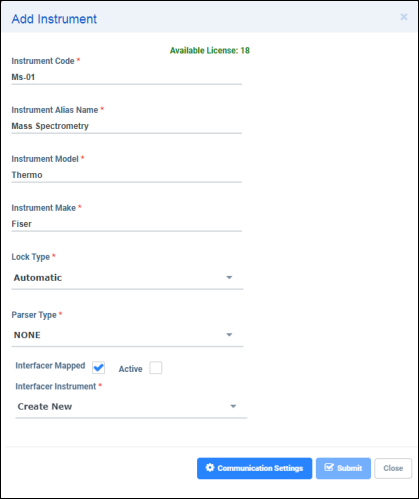
FIGURE: Add Instrument Screen
3.In the Instrument Code field, type the name of the instrument you want to add..
4.In the Instrument Alias field, type the alias name for the instrument..
5.In the Instrument Model field, type the model of the instrument.
6.In the Lock Type box, select Automatic / Manual. If you select Automatic, the instrument will be locked automatically when in use. If you select Manual, then you need to go to the Lock Settings screen and lock the instrument manually.
7.In the Parser Type field, select NONE / WIN_METHOD / WEB_ METHOD..
8.Active: specifies if the instrument is active.
Note: If SDMS is integrated with ELN or InterFACER, respective option appears in as shown above. If SDMS is configured as standalone, then the Active check box alone appears. Integration of SDMS with ELN / InterFACER / standalone is done in DB settings.
9.Click Submit.
Interfacer is a middleware application runs as windows service.
Interfacer Mapped option If checked then the user will be able to save communication settings for the instrument as interfacer instruments are connected and can communicate via RS232/TCPIP. Or user can select the exiting interfacer instrument.
Parser Type options None, WIN_METHOD, WEB_METHOD, if the instrument has fields to parse then the parser engine can be selected here.
Interfacer Mapped option If checked then the user will be able to save communication settings for the instrument as interfacer instruments are connected and can communicate via RS232/TCPIP. Or user can select the exiting interfacer instrument.
WEB_METHOD - Method will parse the fields.
WIN_METHOD – Interfacer service will parse the fields.
If interfacer is integrated with SDMS, the Interfacer Mapped check box, Parser Type field and the Communication Settings field will be enabled in the Add Instrument screen as shown in the figure:
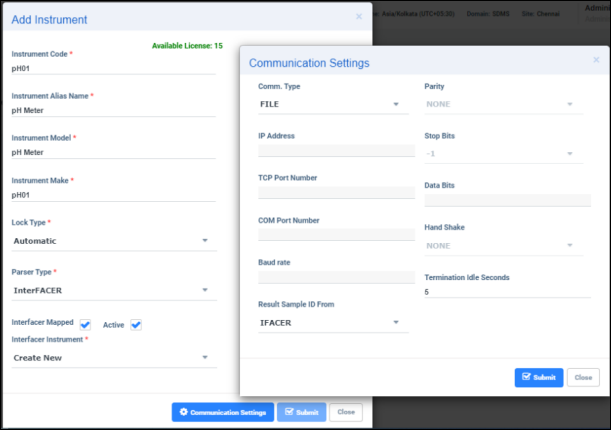
FIGURE: Adding Interfacer Instrument With / No Parsing
10.In the Parser Type field, select Interfacer.
Note: The Interfacer option will not be available if you use Postgre SQL database.
11.Click to check the Interfacer Mapped check box. When Interface Mapped option is checked, the Interfacer Instrument list field appears and you can select the interfacer instrument to add as shown in the figure:
12.In the Interfacer Instrument field, selectNew Instrument.
13.Click Communication Settings. The Communication Setting dialog appears as shown in the figure:
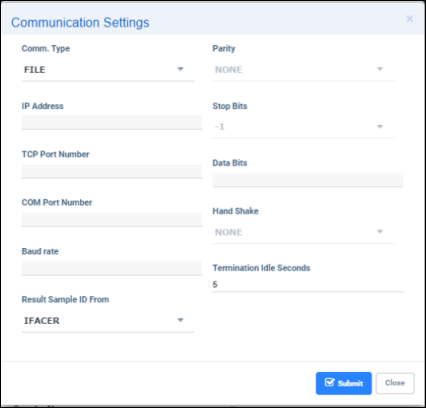
FIGURE: Communication Setting Dialog
14.In the Communication Setting dialog, in the Comm. Type field, select the communication type.
The communication type can be any one of the following:.
TCP _Client Or TCP_Server : The instrument acts as client / server. If you select TCP _Client Or TCP_Server as communication type, then specify the IP Address of the instrument and the port number in the respective fields.
RS232 : If you select RS232 as communication type, then select/type value for Com Port Number, Baudrate, Parity, Stop bits, Data bits and Handshake as applicable.
In the Termination Idle Seconds field, type number of seconds after which a new file is created.For example, if you type 5 seconds, then for every five seconds an new file is created.
Note: Refer respective instrument manual for value ranges for Com Port Number, Baudrate, Parity, Stop bits, Data bits and Handshake fields..
FILE : If you select FILE as communication type, then just click Submit.
For Data logger instrument, the Communication Settings dialog appears as shown in the figure:
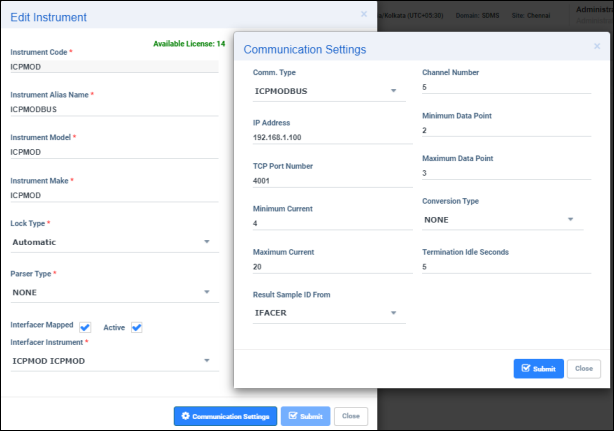
FIGURE: Communication Setting Dialog – Data Log
16.Fill in required fields. Note that when you add an instrument, parser is not required for Data Logger instruments. Hence in the Parser Type field, select NONE.
17.Click Submit. .
18.Click Ok..
To edit instrument details, follow these steps:
1.On the main menu, click, and then click Base Masters. The Base Masters screen appears. Click Instrument to go to the Instrument master tab. The Instrument master tab appears.
2.On the Instrument Master screen, click to select the instrument from the list you want to edit and then click.  The edit instrument screen appears.
3.Do the required changes to the instrument and then click Submit to save the changes.
Note
To export Instrument Master in to Microsoft Excel, follow these steps:
1.On the main menu, click, and then click Base Masters. The Base Mastersscreen appears. Click Instrument to go to the Instrument master tab. The Instrument master tab appears.
2.On the Instrument master screen, click . The file Save As dialog appears.
3.In the Save As dialog locate the folder where you want to store the Excel file and then in the File Name box, type a name for the exported file.
Click Submit. The instrument details are exported to EXCEL as shown in the figure

FIGURE:- Instrument Master - Export to Excel
To retire an instrument, follow these steps:
1.On the main menu, click, and then click Base Masters. The Base Masters screen appears. Click Instrument to go to the Instrument master tab. The Instrument master tab appears.
2.On the Instrument master screen, select the instrument and then click . 
3.In the Confirmation dialog, click Ok.
4.An Audit Trail screen appears for authentication. Type your password, reason and comments appropriately and then click Submit.
5.Click Submit.
Note: You cannot retire an instrument if the instrument is locked. You will see a warning message saying “Currently this Instrument is locked, so cannot retire”.
To export Instrument Master in to Microsoft Excel, follow these steps:
1.On the main menu, click, and then click Base Masters. The Base Masters screen appears. Click Instrument to go to the Instrument master tab. The Instrument master tab appears.
2.On the Instrument master screen, click. The file Save As dialog appears.
3.In the Save As dialog locate the folder where you want to store the Excel file and then in the File Name box, type a name for the exported file.
4.Click Submit. The instrument details are exported to EXCEL as shown in the figure:
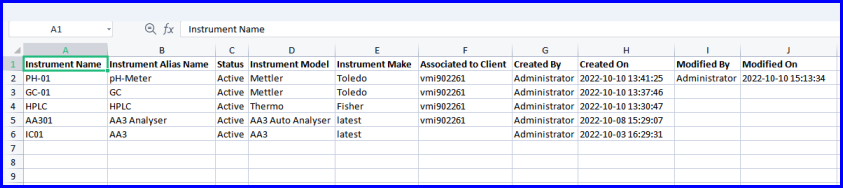
FIGURE:- Instrument Master - Export to Excel
To retire an instrument, follow these steps:
On the main menu, click, and then click Base Masters. The Base Masters screen appears. Click Instrument to go to the Instrument master tab. The Instrument master tab appears.
On the Instrument master screen, select the instrument and then click 
In the Confirmation dialog, click Ok.
An Audit Trail screen appears for authentication. Type your password, reason and comments appropriately and then click Submit.
34.Click Submit.
Note: You cannot retire an instrument if the instrument is locked. You will see a warning message saying “Currently this Instrument is locked, so cannot retire”.
To print instrument list, follow these steps:
On the main menu, click, and then click Base Masters. The Base Masters screen appears. Click Client to go to the Client master tab. The Instrument master tab appears.
In the Instrument master tab, click.  The Print screen appears as shown in the figure:
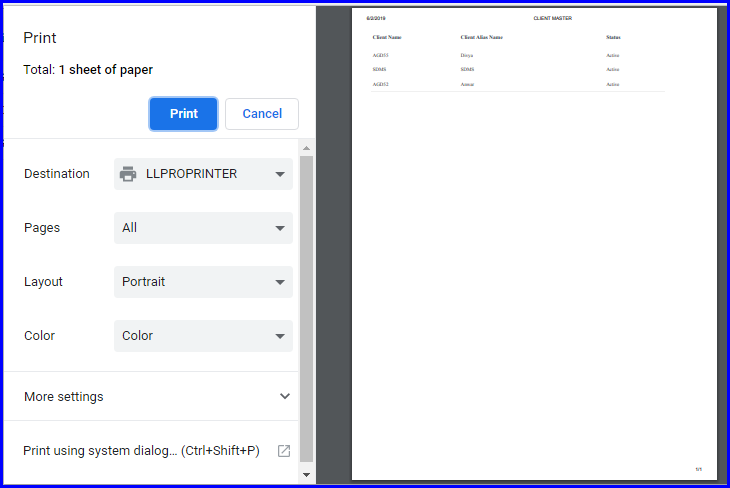
FIGURE:- Print Instrument Master Dialog
In the Print dialog, you can see the print preview of the instrument master on the right side.
Click Print to print the instrument list.
