The Data Scheduler screen helps you to create a schedule for file upload. For this you have to setup the file path, client and instrument.
1.On the main menu, click, and then click  Data Scheduler. The Data Scheduler screen appears as shown in the figure:.
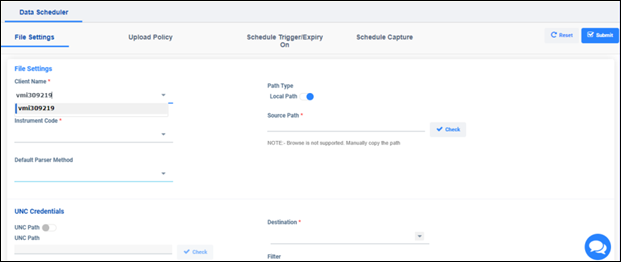
FIGURE: Data Scheduler Screen
The Scheduler screen is designed in a way to scroll down to fill up required details. Alternatively, you can also click the tabs to jump to the respective topics.
Creating a template consists of the following steps
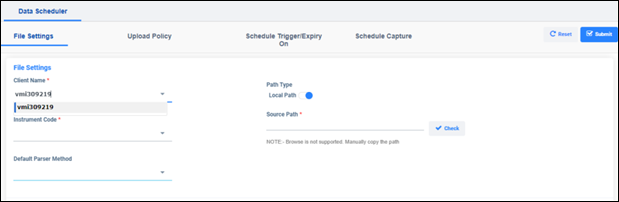
FIGURE:File Settings
2.In the Client Name field, select the client. Client machines that are added to the Client Master are listed here. You can choose the client for which you want to create a schedule.
3.In the Instrument Code field, select the instrument. Instruments that are mapped to the selected client are listed. You can choose the instrument for the schedule.
4.Select the Default Parser Method.
5.The Path Type option is enabled by default.
6.In the Source Path field, manually copy and paste the path that you created to store files captured from the instrument selected.
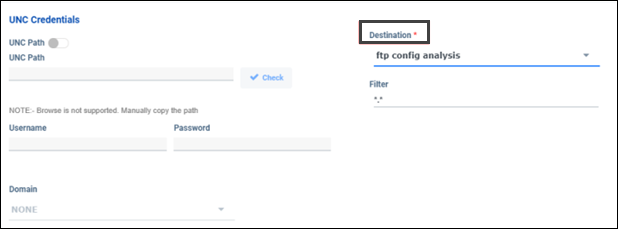
FIGURE: UNC Credentials
7.Choose any one of the path for file upload:
8. Local Path: Click to select Local Path, In theSource Path field, specify the location where the files are uploaded automatically in the storage server.
9. UNC Path: If Source Path is UNC path(remote computer/an instrument), then specify the path in the UNC Path field and provide validUser Name
Info: Data is pulled from the UNC Path and stored in the server.
and Password for the remote computer/instrument. And then select the Domain. Click Check to verify if the given path and login credentials are valid.10.In the Destination field, select the storage server path to upload the files.
11.In the Filter field, type file extensions to filter files separating with comma. For example: *.txt, *.rtf, *.tmf. Files with specified extensions alone will be uploaded. To upload all files type “*.*”.
Here you specify the folder structure the scheduler has to look for files to backup. You can choose complete tree or specific levels for backup.
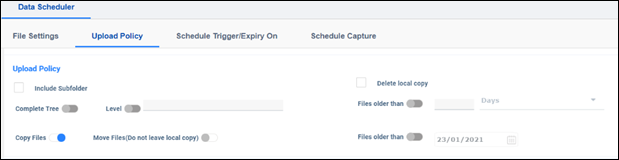
FIGURE: Add Tag Value
12.Click to check the Include Subfolder check box and then do the following:
13.By default, the Complete Tree option is enabled when the Include Subfolder option is enabled to instruct the scheduler to look for the files in all the levels.
14.If you do not want to look all the levels, then click Level and then type the level number in the field up to which the scheduler has to look for files.
15.Click Copy Files to copy files from the source path leaving original files unaffected.
16.Click Move Permanently to copy the files from the source path and delete the original files.
17.Click to enable the Delete Local Copy option and then specify when to delete the local copy of the files. This will delete the local copy of files on the specified date. You can also type number of days/week/months/year and specify the number.
18.Click the Trigger On field to set the date for the scheduler to start. And set the time in the Time field.
19.Use the following options appropriately:
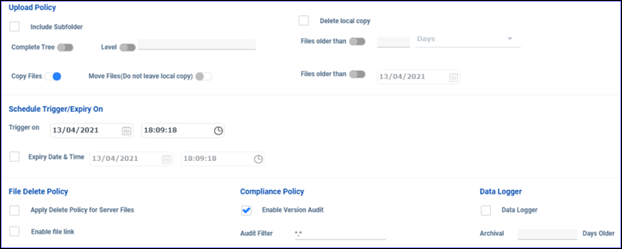
FIGURE: Setting up Backup Period Without Data Logger
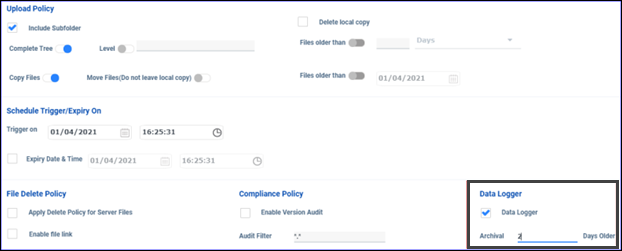
FIGURE: Setting up Backup Period – With Data Logger
20.In the Trigger On field, select the date and time to trigger the schedule automatically.
21.Click to enable the Expiry Date option to set expiry date for the schedule to expire automatically and then set date and time for the same.
22.File Delete PolicyFile Delete Policy coordinates with delete policy defined in the system and enables to keep the bunch of latest version and delete the older versions.
23.Apply Delete Policy for Server Files – Enabling this option applies delete policy to the files stored in server machine also.
24.Enable file link - Enabling this option creates a link for each file uploaded in the schedule and stored in a table. User can use this link when required.
25.Under Compliance Policy, click Enable Version Audit. Enabling this option prompts for authentication from the user whenever there is a new version of the file is generated for the selected file type. In the Audit Filter field, type the file type to audit the specific type or type " *.* " to audit all file types. If Enable Version Audit is enabled, then whenever there is a new version of the file is generated /when you edit a file / rename a file, the File Audit screen appears enabling the user to view the version details and prompts for authentication as shown in the figure:
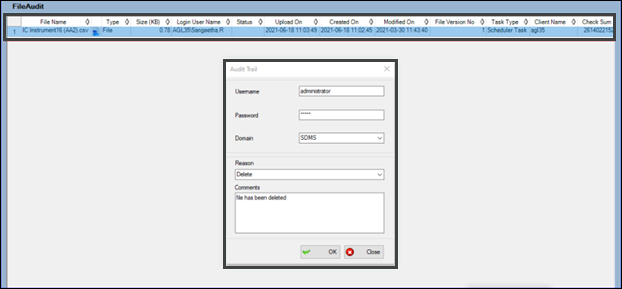
FIGURE: Add Template
26.Click to check the Data Logger check box, to enable create log for every capture from the instrument. You can filter and view captured log in the Data Logger tab.
27.In the Archival___Days Older field, type the number of days older the files to be archived. If you type 10 days, then log files older ten days are archived. You can view the archived log files in the Data Logger tab by using the Open Archive option.
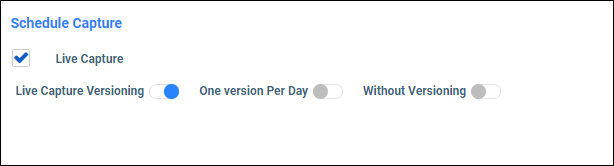
FIGURE: Template Mapping Tab
28.Live Capture is a backup policy enables you to decide whether to maintain a live versioning system (ie. Whenever a file is updated a new version will be created) or the daily version, the final updated version will be maintained as version for the day.
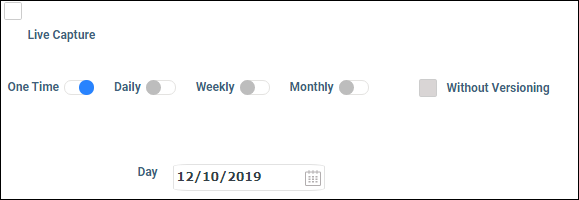
FIGURE: Template Mapping Tab – Configure Dialog
29. Click Submit. The scheduler will be activated on the mentioned date and time. And will be running till it expires based on the expiry policy defined.
The Scheduler Metadata section enables to configure extraction of metadata of the uploaded files. The template is selected and the tags in the template are mapped to the parts of sample file name / folder name in the uploaded file path for extraction. Once extracted, you can also set rules for the extracted tags.
To extract file metadata, follow these steps:
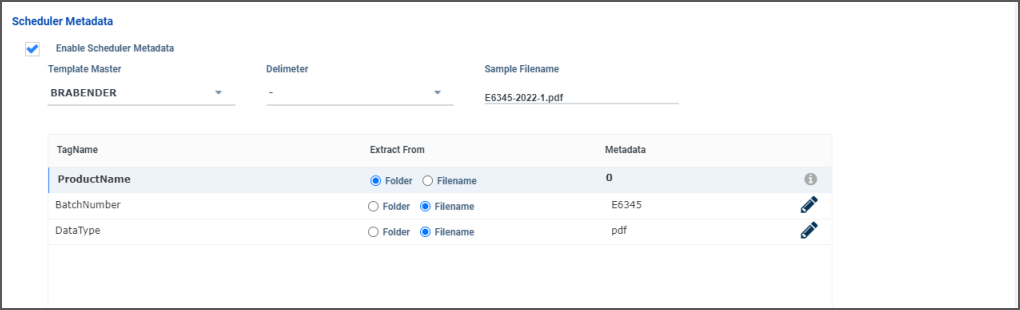
FIGURE: - Scheduler Metadata Tab
Sample filename: E6345-2022-1.pdf.
File Metadata | Tags mapped |
E6345 | BatchName |
DataType |
In the TagName field, tags from the selected templates appears. Select a tag, mention where to extract values for the tag, map with the sample filename metadata.
To extract Product Name , follow these steps:
To extract the product name / method name from the source path, type 0 to extract the parent folder name, type -1 to extract the grandparent folder name. And to get sub folder name, mention 1 , 2 , 3 etc.
For example, in the source path "D:\Anwar\01_Current working\Schedule path\BRABENDER-LABSOLDATA\Analysis"
If you specify 0 in the Metadata field, Analysis is extracted.
If you specify 1 the Metadata field, BRABENDER-LABSOLDATA is extracted.
To extract BatchNumber, follow these steps:
 select E6345 and then click Submit as shown in the figure:
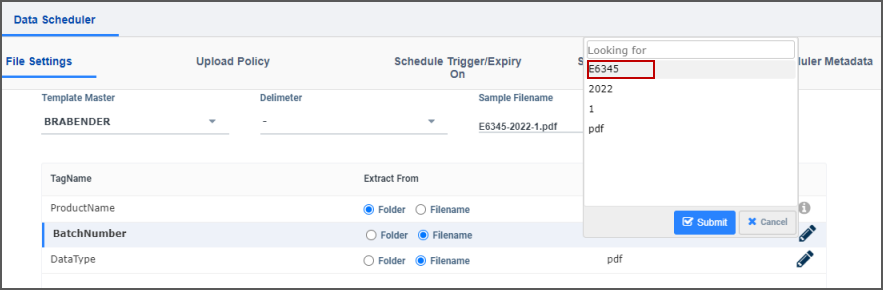
FIGURE - Extracting BatchNumber
To extract BatchNumber, follow these steps:
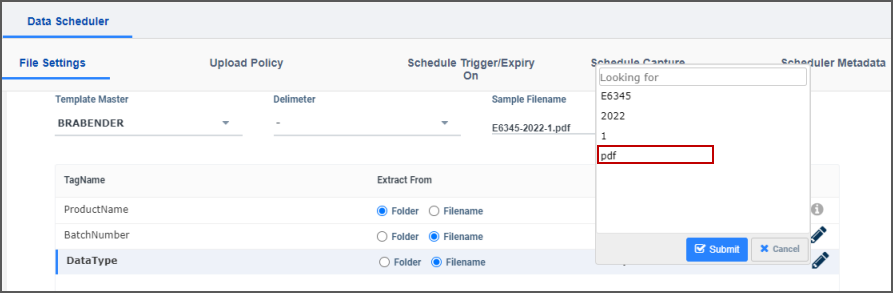
FIGURE: 61 - Extracting DataType
You can set rules to the extracted metadata. For example, for the DataType tag, the .vsu and .pdf values are extracted. Let's set following rules to the DataType tag.
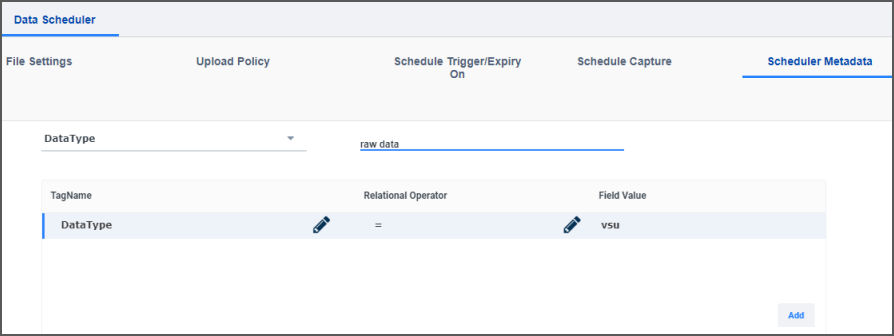
FIGURE:- Setting Rule for the Extracted Metadata
Same way, you can add rule for the .pdf extension. Once added, the added rules appears as shown in the figure:

FIGURE:- Rules Set
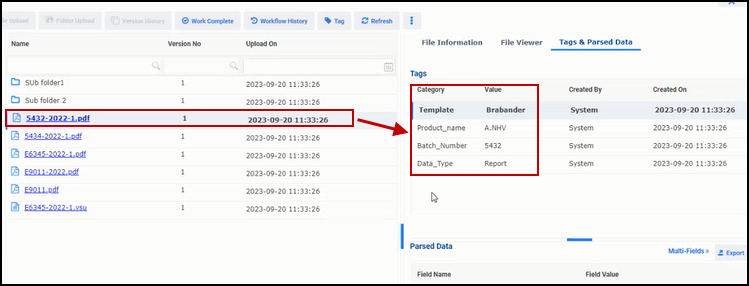
FIGURE:- Data Explorer - Tags & Parsed Data Tab Rule Applied 1
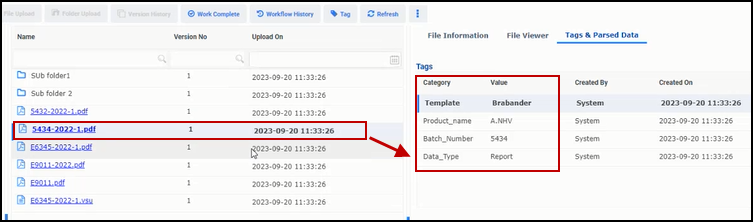
FIGURE:- Data Explorer - Tags & Parsed Data Tab Showing Rule Applied 2
